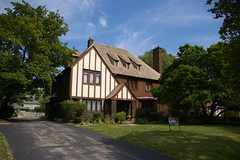
I've been muttering to myself about how the POs (or perhaps the PPOs) finished the basement ceiling when they finished the basement. Oops. I was wrong. Last night, I was looking at the ceiling and the plumbing, trying to figure out how to gain access.
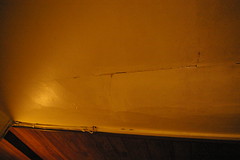
The ceiling, it seems, is composed of some sort of material on metal lath. I'm inclined to say that it is mortar or concrete of some sort - it feels harder and more rough than plaster.
I've never seen anything like this. I'm not familiar enough with the style of the work to say whether it was original or later. Whatever the case, it won't make working on the plumbing or utilities hidden underneath it easy.
Tuesday, December 30, 2008
The Basement Ceiling
Labels:
basement,
ceilings,
electrical,
lath,
our house,
plaster,
plumbing,
previous owners
Monday, December 29, 2008
My New Computer!
Yesterday, I went to Pittsburgh, to pick up my new computer, a Power Macintosh G4/450 DP that I found, with a 17 inch Apple Studio Display, on Craigslist for a mere $135. I managed to get 2 gigs of ram pulled from another working G4 on eBay for $30. The hard drive that will go in it, to supplement the current one, is a 1TB Western Digital. I'd considered Seagate's 1.5TB drive, but there were too many negative reviews, and the price per byte was pretty close.
It's a lot of computer for $300 - although it only met that budget because I haven't purchased a DVD burner for it yet. I'll be buying that as soon as I sell off some of the parts from my dead PowerBook G3 and A's dead PowerBook G4.
It's a lot of computer for $300 - although it only met that budget because I haven't purchased a DVD burner for it yet. I'll be buying that as soon as I sell off some of the parts from my dead PowerBook G3 and A's dead PowerBook G4.
Labels:
Apple,
computers,
Craigslist,
G4,
Macintosh,
other junk
Thinking Warm Thoughts
Over the holidays, I talked with my father-in-law, an HVAC tech, about my current boiler and possible future options. Our system is hot water, which lends us to greater efficiency potential than is possible with a steam heat system. He had just installed a Burnham Alpine boiler in the church across the street, and had primarily good things to say about the company. As a tech, he appreciates that it is still easy to get parts, quickly, for 35+ year old systems, while some other manufacturers discontinue parts after 10 years.
Although he wasn't able to give specific numbers, he thought, given our usage, that a new boiler would probably pay for itself in 5 or so years. The problem becomes then one of determining how we will pay the $5000-7000 that it will probably cost for the purchase and installation of the system.
The issue that this brings to mind for me, however, is one of venting. The Burnham Alpine uses PVC pipes for ventilation. High efficiency boilers and hot water heaters have special ventilation requirements to meet and as a result of their higher efficiency. They draw air in from outside because it is cleaner, and therefore burns more efficently than, say, sawdust or humidity laden air. They must exhaust outside, rather than into the chimney because their exhaust is cooler, more humid, and more dense, and would lead quickly to the collapse of the chimney in just a few years.
The normal installation would be to just run the vent pipes through the wall of the house. I find the idea of two bright white PVC pipes poking through the wall of my house rather unattractive. Yes, they could be painted to match the brick, but I'm still not completely comfortable with that solution.
One alternative that my father-in-law suggested was to run the vent pipes up the existing chimney. Our boiler and hot water heater use one chimney, while our fireplaces use another, so this wouldn't be a problem. He thought it wouldn't be too difficult to run things that way - just a matter of dropping two or three lengths of PVC pipe down the chimney. While this would cost more, I think the result is worthwhile.
This all leads me to thinking about the hot water heater and its eventual replacement with a tankless model. Tankless hot water heaters have their own special ventilation requirements, which seem to tend toward stainless steel, but which could probably be fit into the chimney if necessary. If I could settle on one system, it seems that it might be reasonable to drop in the vent pipe for the water heater at the same time as the vent pipe is being installed for the boiler.
Of course, I'd love to hear other ideas, including less ugly ways to conceal vents run through walls.
Labels:
basement,
boiler,
chimneys,
future plans,
hot water heater,
hvac,
our house,
plumbing,
venting
Random thoughts
A. is spending a few more days with her family before returning to Cleveland. Theoretically, this will provide me with an opportunity to get some stuff done, but in reality, it just leaves me lonely.
She'd like me to get the ceiling completed in the master bath shower, as would I, but I'm having trouble making everything fit properly. Sigh. She also wants me to get the hall cleaned up and vacuumed, a task which should be somewhat easier.
Tonight, after work, I'm going to help my dad move some art, but I should have at least a little free time - enough to move the mattress out of our bedroom and into the guest bedroom (new mattress tomorrow!) and maybe clean the hallway.
I can't wait until I can take some vacation time and use it to work on the house. Wow - what does it say that I want vacation time for housework?
Tuesday, December 23, 2008
Should this worry me?
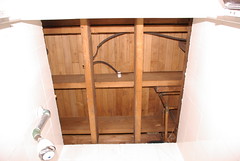
Last night, I finished the rip out for the light fixture in the shower ceiling. It was a beautiful chunk of porcelain, but unfortunately, a bare bulb in such an environment is no longer up to code, and the city chose this as one of the few violations (of the many many that we posess) to write up. The fixture is curious in that it mounts without any visible screws - the screws that hold it to the backing plate are in the socket itself. I'll have to post a photo of this at some future time.
Since this photograph, I've sistered in some 2x3s to hold the drywall flush with the edge of the tile - the plaster and fiberboard combined were about 7/8" thick. But before getting to that point, I took some photographs from the vantage point afforded me.
The following two images are of the same location.
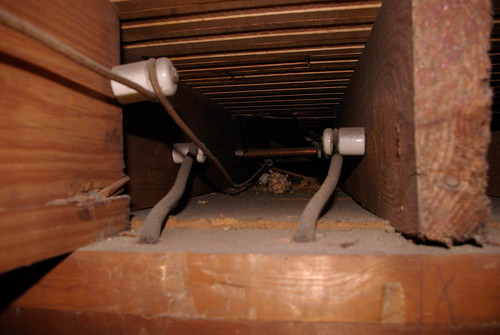
The stud in the foreground at the bottom of the picture is one edge of the shower enclosure.
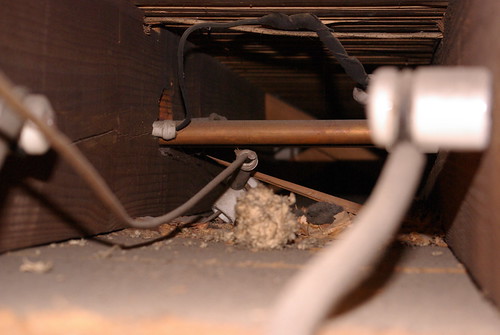
This is a close up. Note the cracked joist, the tube with a nail resting in it, the wiring joined outside a box, the knob and tube wiring just resting on the ceiling, the beautiful notching and drilling...
The strange part of all this is that I can't figure out the purpose of the copper pipe that necessitated all of this. This pipe, I assume, would be servicing something on the third floor - yet there's nothing there or anywhere near where this pipe appears to run. If it were a radiator pipe, there should be another one accompanying it.
It's just a small crack, right? I really don't want to pull up the floor up there, not yet.
Labels:
ack,
electrical,
framing,
master bedroom,
our house,
third floor,
wiring
Monday, December 22, 2008
Art installation in the airlock

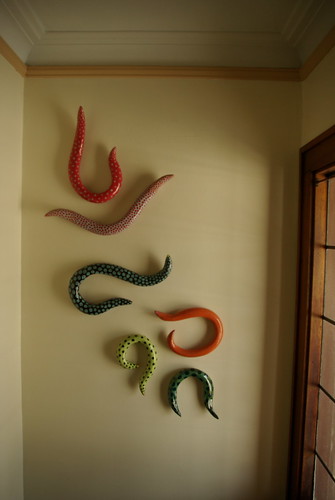
We'd been trying to figure out where we'd install this work by Northern Ohio ceramic artist Eva Kwong. None of the other walls seemed suited to it, until we found this one, in the airlock, between the front hall and the front door.
This photo should provide a better idea of how it fits in the space.
Plaster and Fiberboard walls
Not so long ago, I wrote about my walls, which I identified as plaster and lath. I had torn out one of the walls, on the stairs going down to the basement, because they were so badly bowed that the city had written them up as a violation it its point of sale inspection. I assumed that the fiberboard material used for the walls was a replacement, used when part of the tile was ripped out to install the cabinets in the 1950s.
Then, this weekend, I ripped out the ceiling in the shower in the master bath. The bare bulb attached to it in a lovely porcelain fixture was, unfortunately, another code violation that the city said we had to deal with, in favor of a recessed fixture. The ceiling was made from the same fiberboard as the wall on the basement stairs, covered with a thick layer of plaster. It seems that this material was used throughout the house.
While this fiberboard and plaster combination may not be as durable as lath and plaster, it seems to have been good enough, surviving for 80 years in one of the more difficult environments for plaster, the shower stall.
It seems, if you look at the above photograph, that these fiberboard panels were only nailed at the edges. I'm seriously considering the use of a countersink bit and some drywall screws to help even out the panels and make for a smoother wall.
Has anyone ever encountered these walls or know of anyone who has dealt with them? Is there some basic reason why drywall screws shouldn't work to hold them in place? Is there anything else I should know?
Then, this weekend, I ripped out the ceiling in the shower in the master bath. The bare bulb attached to it in a lovely porcelain fixture was, unfortunately, another code violation that the city said we had to deal with, in favor of a recessed fixture. The ceiling was made from the same fiberboard as the wall on the basement stairs, covered with a thick layer of plaster. It seems that this material was used throughout the house.
While this fiberboard and plaster combination may not be as durable as lath and plaster, it seems to have been good enough, surviving for 80 years in one of the more difficult environments for plaster, the shower stall.

It seems, if you look at the above photograph, that these fiberboard panels were only nailed at the edges. I'm seriously considering the use of a countersink bit and some drywall screws to help even out the panels and make for a smoother wall.
Has anyone ever encountered these walls or know of anyone who has dealt with them? Is there some basic reason why drywall screws shouldn't work to hold them in place? Is there anything else I should know?
Labels:
fiberboard,
lath,
living room,
our house,
plaster,
walls
The worst way to plumb an icemaker?
We were told by the previous owner that the icemaker in the fridge didn't work because there wasn't any plumbing running to it. When the refrigerator was replaced, we found that there was, in fact, a copper line running to the icemaker, but it was crushed, as the refrigerator had rolled over it. I asked A. to buy a new line for it, which turned out to be about 8" too short. When I was able to extend the line, I found that the pipe it connected to was warm to the touch - not something that you want with an icemaker, but one that caused my parents trouble with their icemaker for years.
I looked at the pipe, but it wasn't connected obviously to the hot water heater, so I set this problem aside to deal with another day, after I'd had time to think about it. This time, the line was hot to the touch. I traced the pipe to the extent that I was able to - and found that it ran into the boiler! Eeew.
I looked at the pipe, but it wasn't connected obviously to the hot water heater, so I set this problem aside to deal with another day, after I'd had time to think about it. This time, the line was hot to the touch. I traced the pipe to the extent that I was able to - and found that it ran into the boiler! Eeew.
Labels:
appliances,
basement,
boiler,
icemaker,
kitchen,
plumbing,
previous owners,
refrigerators
Friday, December 19, 2008
Dining table and chairs
One of the reasons we wanted such a big home was the hope that ours would be the one that our whole family gathered at for the holidays. Ever since I saw the massive flitch inventory at Hearne Hardwoods I've wanted to have a dining table made from a single slab of wood. With time, I came to consider that perhaps a dining table made from two slabs, bookmatched together, might be an acceptable alternative. This is due partially to the lack of massive boards available in colors complementing the dining room's rather dark wainscotting within our budget - while we could afford something in maple, or even sapele, walnut was just too expensive.
A couple weeks ago, I went to talk to Dean at Metro Hardwoods at 5901 Train Avenue, in Cleveland, Ohio (216-651-2345). He tends to keep late hours - generally about 4 in the afternoon to two or so in the morning - which is actually quite convenient. There's only a small sign on the door of the industrial building where he has his space, but the lot of massive tree trunks across the street provides an obvious sign. On this visit, the most interesting thing I saw was some Siberian elm with a natural edge on one side, 15-18 inches wide, at a mere $3 a board foot.
I described to Dean what I was looking for in a dining table - something about 10 feet long (the dining room is 14 x 15), 40-48 inches wide, made from a single slab of wood. As his bandsaw is only capable of cutting 30 inch wide boards, we agreed that two bookmatched boards would be a reasonable compromise. My hope, I told him, is for a reasonably rectangular table, though I definitely want at least something of a natural edge on one side of the boards.
I'm not absolutely set on walnut - I just want something dark enough to look good in the dining room without having to resort to a stain - I'd strongly prefer to only use an oil and wax finish. For instance, a lighter color wood with a significant bark inclusion would probaby look good, too.
The base of the table will be of a trestle design, the exact nature of which will be determined by the top and available materials. If, for instance, the table top has significant splits or other structural issues, the base will have to be more extensive to evenly distribute the stress. I hope for the base to be cut from the same log, perhaps with natural edges.
Dean said that he should have some wood ready to show me in about a month. When I pressed him for a ballpark figure, he said that it would be in the neighborhood of $300-400 for walnut, which might also take longer to obtain/cut, or less for other species. This was great news - given the offerings at Hearne Hardwoods, I'd been expecting to spend 2-3 times that. What this really means is that Metro Hardwoods will be getting more of my business as I am able to start on other projects sooner, like a desk for the library, some coffee tables, and a massive freeform bookcase for the living room.
Another part of my decision to stay local was the lack of chairs available in sapele or in colors that would go well with it (as well as the issue of how one moves a board from this flitch like 2492 or 2493 three hundred miles without it splitting further).
I don't see myself as the sort of person who makes chairs. Cutting boards and things with square edges, sure, I can handle that. But all of the shaping and bending that goes into a chair just seems beyond what I want to learn, especially as these are skills that I doubt I'd put to use in many other projects. Finally, I'd rather defer to those other individuals who have learned how to make a comfortable chair, something that would surely take even more time for me.
The plan, I think, is to buy one or two chairs a year, so the chair needs to be something that is in production from a furniture maker who will still be making them in five or six years. Based on the size of the table, I expect to have eight or ten side chairs and two armchairs.
I really really like the lines of Thomas Moser's Eastward Chair, which is available in walnut. I've had the pleasure to spend some time in their New Gloucester Rocker and if these chairs are as comfortable as it is, I'd be quite pleased with them. The price, however, is about two times what the very high end of our budget is, I think. Comfort is important - I'm not going to get a chair simply because it is sexy.
I also really like birdcage Windsor chairs. These are a good example of exactly what I think would look good, although I've yet to find one in production that I really like. Of course, I'll keep looking.
I'd love to read some suggestions of other chairs worth considering.
Labels:
dining room,
furniture,
lumber,
our house,
woodworking
That's not Wright!
I was looking for photographs of other Tudor Revival houses on Flickr when I came across this photograph of Frank Lloyd Wright's Nathan Moore House (built 1895, rebuilt 1923). The Nathan Moore House, in Oak Park, Illinois, is one of the most important Tudor Revival houses in America. Look again at those garage doors. I can't believe it either. Given that that house, today, would probably cost at least a million dollars, there has to be someone who could have retrofitted a mechanism for opening them automatically within the budget of the current owners. Of course, if it wasn't in their budget, would it really have been so hard for them to get out of their cars to open the doors?
Just thought I'd point this gem out, lest you think that such injustices only happen to pedestrian, run of the mill houses.
Just thought I'd point this gem out, lest you think that such injustices only happen to pedestrian, run of the mill houses.
Labels:
Chicago,
Frank Lloyd Wright,
garages,
Illinois,
Oak Park,
other houses,
remuddling,
Tudor Revival
Better photographs of the Nursery
A. took some better photographs of the nursery, so I thought I'd share them:


Now we just have to finish assembling all of the wonderful cartoon Ikea furniture and perhaps paint the baseboard. A. likes to tease me about how cartoony the furniture is - she should just be glad that she's been able to relegate it to the nursery - if only it was bigger, it'd probably be in other rooms in the house, too!
I should state, for the record, that I have two significant annoyances with Ikea with regard to the Mammut dresser. The first is but minor - they use two pieces of masonite to cover the back - could it really have taken up that much more space in the box to use a single piece, which, in the long run, would have provided additional structural strength? If I ever have to rebuild the dresser and glue all the edges, I will use a single piece for the back.
My greater annoyance is with the drawer slides. The halves of them that mount on the drawers are fairly intuitive. The half that mount on the case seemed intuitive, until I tried to install the drawers and saw that the drawer sloped slightly downwards. At first, I credited this with construction issues, but soon realized that while that might be expected after a few years, it shouldn't be the case right away. I took out the drawer and took the glides off both it and the case, assuming that I'd reversed them. Nope - the ones on the drawer clearly could not be mounted on the case. After cursing to myself a bit and blundering around some more, I realized that I had reversed the part of the drawer glides on the case left and right. After removing and reinstalling all of them, I was finally able to install the drawers.
I fault Ikea's reliance on interchangability of parts for this - it would be nice if there was some sort of visual cue on the glides so that one was clear as to which side is up and front. Alternately, the screw holes could be placed in the glides in such a way that it would be immediately obvious when they were mounted incorrectly.
Labels:
Ikea,
master bedroom,
nursery,
our house,
paint
Thursday, December 18, 2008
About the Intro
In my introduction I state that this house will be "less of the "how are we going to make dinner without a functioning kitchen" type of place. Unfortunately, this is not quite the case.
As I have mentioned previously, the c. 1950 Crown gas stove that came with the house was pretty much DOA. As such, my amazing wife has been preparing meals using a single electric burner, a microwave, and a toaster oven. She's been doing an impressive job of it, too.
We've been making very slow progress on this front, primarily because none of the options are especially attractive. We haven't had much luck finding a replacement stove on Craigslist or eBay - the closest decent contenders have been in Chicago, Illinois, 350 miles away. The cheapest new 40" gas stove is $1600. Putting a narrower stove between the two cabinets would probably be ugly. And while there's a certain novelty to installing two 20 inch apartment stoves, that doesn't seem quite right either.
So we're waiting and hemming and hawing. If you have a 40" white (or even some other color - just not stainless) gas stove that is in good operating condition, and hasn't been sitting in your basement for the past three decades, I may be interested, if you're within 300 miles of us. Of course, we're probably just going to wait some more, as my wife bakes Christmas cookies two at a time in the toaster oven.
In other news, last night I tried to hook up the water line for our new refrigerator. A. had, at my request, purchased a 10' icemaker hook up kit. I pulled out the old copper line, which had been crushed, and enlarged the hole. I hooked the hose up to the refrigerator, and, with a great deal of difficulty, used the old copper line to thread it through the floor. I threaded it under the existing pipes in the basement (note: proximity to the hot water line may be an issue) and came up short. My hope was that the location of the refrigerator was the issue, so I pushed it back into place. Nope - still about 8" short.
I hoped that I'd be able to buy a new line, just a bit longer, with all the fittings at the store today, but alas, they are not avaiable longer than 10'. I guess it's just a matter of waiting for it to do the plumbing work itself.
Labels:
appliances,
kitchen,
our house,
plumbing,
refrigerators,
stoves
Moving forward
We are moving forward on the house, slowly but surely.
Last night, I finished ripping all the staples and tack strips out of the baby room. Now all that remains is to sand and finish the spackling where the blinds were and to touch up the paint. I'll also want to repaint the quarter-round on the floor, but I'm not sure if that needs to be done immediately. It's half yellow, due to the location of the carpet. Also, the floor needs to be scrubbed to remove the last bits of carpet padding residue, but that duty has been delegated to A.
I installed drywall yesterday over a very small wall in the basement, due to concerns that our car might try to climb into it and get stuck. Now we'll be able to move the litterbox from our first floor bathroom to the basement!
I also schlepped all of the lumber from the garage into the basement. I purchased some metal shelving brackets to hold the wood, though it has become clear that I will need more. I will get my workshop organized, one way or another. I'm inclined to cut a certain amount of the butternut I purchased on eBay a few years ago into firewood. It has twisted and turned so much that I doubt I could even use it for shop shelving.
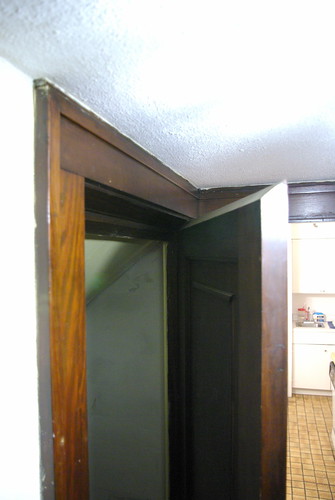
On an unrelated note, I thought I'd share this view of the basement door. Clearly someone made an error when framing it and so had to cut the door to fit. Aesthetically, I think that it is more interesting than the door would have been otherwise.
Last night, I finished ripping all the staples and tack strips out of the baby room. Now all that remains is to sand and finish the spackling where the blinds were and to touch up the paint. I'll also want to repaint the quarter-round on the floor, but I'm not sure if that needs to be done immediately. It's half yellow, due to the location of the carpet. Also, the floor needs to be scrubbed to remove the last bits of carpet padding residue, but that duty has been delegated to A.
I installed drywall yesterday over a very small wall in the basement, due to concerns that our car might try to climb into it and get stuck. Now we'll be able to move the litterbox from our first floor bathroom to the basement!
I also schlepped all of the lumber from the garage into the basement. I purchased some metal shelving brackets to hold the wood, though it has become clear that I will need more. I will get my workshop organized, one way or another. I'm inclined to cut a certain amount of the butternut I purchased on eBay a few years ago into firewood. It has twisted and turned so much that I doubt I could even use it for shop shelving.

On an unrelated note, I thought I'd share this view of the basement door. Clearly someone made an error when framing it and so had to cut the door to fit. Aesthetically, I think that it is more interesting than the door would have been otherwise.
Tuesday, December 16, 2008
Plaster walls aren't supposed to look like this, are they?
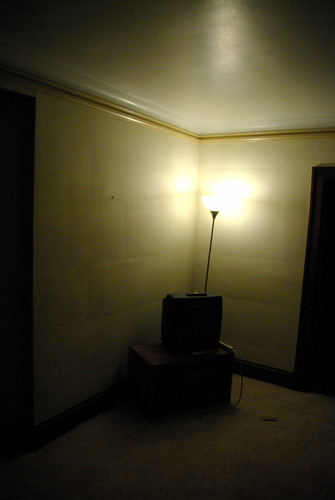
Please excuse the awful lighting - it was my attempt to make the issues with the walls more visible.
For the most part, the walls in our house are in good shape. The plaster shows few issues. The only wall that was really bad was the one on the stairs going down to the basement, which appeared to have been re-done previously, and which I have already tackled.
These walls in the living room are the exception. While I'm perfectly comfortable with the occasional plaster bulge, this seems to be quite a bit more than that. Is this the sort of situation where plaster washers should be used? Alternately, would it be acceptable to just do a couple of thin coats of spackle in the valleys of the cracks to even things out?
I ask because A. insists that this needs to be dealt with. I will gladly do so, but I'm trying to figure out what to do. I don't want to replaster the walls, as that is almost certainly beyond my skill set.
Labels:
interior,
living room,
our house,
plaster,
walls
Monday, December 15, 2008
Proof of progress

This weekend, my stepfather helped me remove the old ceiling fan which had some issue brought up in the point of sale inspection. It had recently shed a blade when it was bumped lightly, so it was time for it to go. The fan was removed without incident, but one of the old wires broke (due to the way that it had been flexed by the fan). Next weekend, with a new box and some new wire, we'll have a new light.

Today, A. and I (but mostly A) painted the baby's room. I then proceeded to rip out the carpet. The floor looks surprisingly good.
Labels:
baby room,
carpet,
electrical,
master bedroom,
our house,
paint
A beautiful new refrigerator
This morning, at the exceptionally early hour of 8:15, we recieved our new LG bottom drawer refrigerator, a Christmas present from my dad and stepmother. It is a bottom drawer model, in white - not the stainless steel that seems to be all the rage these days. We take great pride in our excellent color choice, bucking the trend from the dark monotony of stainless steel.
We had expected a phone call from Sears to inform us of the delivery time, but evidently, they had not heard the phone number correctly. This made for an interesting series of events when A. informed me, while I was in the shower, that the appliance delivery people were here.
They determined that the refrigerator would not fit through the path I had hoped would work. This necessitated the removal of the swinging door between the kitchen and dining room. I dinged the dining room door frame a bit with the door in my efforts to get it out of the way. Ugh.
Much to our surprise, when the old refrigerator was removed, there was a water line underneath it, albeit one that was crushed to such an extent that water would not flow through it. This was a surprise because the previous owner had told us that the reason why the icemaker didn't work was becuase there was no water line running to it. Surely it will be easier to repair this existing line than it will be to run a new line.
Additionally, we were pleasantly surprised to learn that the area underneath the refrigerator is tiled, unlike the area under the stove. This will provide us with a source for matching tile, should we ever choose to fix the cracked floor tiles.
Saturday, December 13, 2008
Insulating without rewiring?
My house has no insulation. It is on the large size. Thus, I dread my upcoming gas bills.
I've been installing weatherstripping on the frames of the storm windows and will do the same with the windows themselves, if we have a warm day anytime soon. I've come to realize as I weatherstrip the windows that more cold air seems to be coming in from around the edges of the windows, presumably due to a lack of insulation around the window frame. Given that the exterior of the house is brick and that that there isn't any trim around the windows (just a nice rounded plaster edge), I have to imagine that gaining access to the framing around the window won't be easy.
My bigger question, though, is about insulating the house as a whole. I'd like to be able to blow in insulation, but everything I've read seems to indicate that you cannot blow in insulation where knob and tube wiring is present.
The wiring, while knob and tube, is in excellent condition. Every fixture I've removed is in a box, and on all of them, the insulation is in good condition. The current electrical service meets our needs without any trouble. As a result, I don't feel a strong desire to rewire.
I welcome any thoughts, ideas, and insights on the subject.
Labels:
electrical,
insulation,
our house,
windows,
wiring
Friday, December 12, 2008
The bulge in the wall and its reprecussions
A couple days ago, I ripped the drywall and fiberboard off this wall, on the stairs leading down to the basement. On the other side of this wall is the kitchen. Personally, the massive bulging in the wall wasn't an issue - there's a similar bulge on the basement stairs wall at my parents house - but it was one of the things written up by the city in the point of sale inspection, so it needed to be fixed.
Underneath the drywall, I discovered metal lath and lots of mortar. It seems that the tile in the kitchen is original to the house, not a 1950s renovation, as I had suspected. The tile is yellow, but has been covered with several coats of white paint, presumably because the previous owners had the same question that I do - what do you do with a whole kitchen of yellow tile?
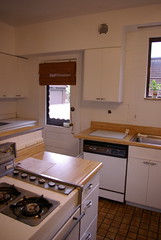
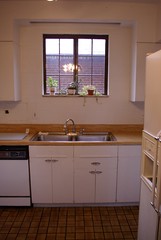
The tile covers the wall behind the kitchen sink, all the way up to the soffit. It is trimmed nicely around the window. It also covers the wall by the bar sink, to the left and the area underneath the bar sink - presumably this was the icebox nook originally. I find it curious the way that the trim around the doorframe was cut - this was part of the reason why I had assumed that the tile was a later addition.
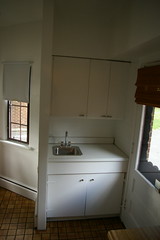
This more clearly illustrates the area around the bar sink - the walls are tiled on all three sides.
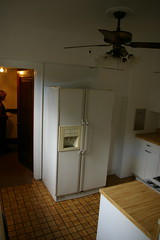
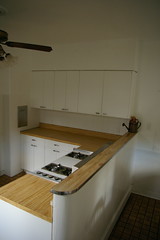
The dividing wall is covered with tile on the stove side, with a nice bullnose at the end. The area above the countertops is tiled and the chimney, the bit of wall that juts out between the counter and the tall skinny cabinets, is tiled from floor to ceiling. The tile was cut out behind the tall skinny cabinets. It seems to only go as high as the top of the refrigerator, though it is possible that it was plastered over.
It seems reasonably likely that the space where the refrigerator and adjoining tall skinny cabinets are was originally the location of the stove - it's about the right size, and would be convenient for exhausting the stove, if that was desired.
For the forseeable future, it is unlikely that there will be any major changes - the kitchen works well the way it is. I really really dislike the way the soffit half-covers the doorframes and will probably be cutting it away as soon as I can figure out what to do with the space above the refrigerator. We also hope to remove the existing countertops and replace them with butcher block, using the tile as a backsplash.
However, being who I am, I can't stop thinking about possibilities. How could one possibly make a kitchen with so much yellow tile work? There is enough tile behind cabinets and the stove to do any necessary repairs, so that isn't an issue. A nice red Linoleum floor would probably help. Perhaps a row of accent tiles in a different color would break up the monotony. Or perhaps there are some other colors in this kitchen, hidden underneath the paint.

A similar yellow works in this kitchen, with a green accent. Adding a border might be more interesting if it didn't mean resetting all that tile in order to have the spacing of the tiles be correct.
Wednesday, December 3, 2008
Compact fluorescent bulbs and 1920s light fixtures
Our house has several original 1920s light fixtures that appear to be incompatible with the compact fluorescent bulbs I have purchased. These fixtures are designed to have a bare bulb. They are metal of some sort and generally floral in appearance. There's one in the basement, a couple in various closets, and a couple in the attic - all places where things tend to go unchanged, so long as they do the job.
I am unable to get the CFLs that I've purchased to work in any of them. The problem is that the CFLs cannot screw far enough into the socket to complete the circuit, because of the relatively wide ballast at their base.
Has anyone else had this problem, or been able to find a solution other than rewiring the socket?
Monday, December 1, 2008
I need stove help!
As as been previously discussed, our 1950 Crown stove is pretty much DOA. I've been looking for another stove to fit in between the existing cabinets. The current stove is 40 inches wide, so we need a replacement that is the same size.
I'm looking for a stove that meets the following criteria:
1. 40 inches wide
2. natural gas
3. doesn't have a huge "dashboard"
4. is currently operational
I'm willing to drive a reasonable distance, but even going as far away as Chicago or Baltimore, I'm having trouble finding anything. I've considered buying a new stove, but they are simply too expensive - the lowest price I've seen is around $1600.
Then I had a brilliant (or stupid) idea: why not buy 2 20 inch wide apartment stoves? They're available new, so I wouldn't have the hassle involved with an old stove, and wouldn't have to drive a gajillion miles to get it. I could have two ovens and all the joys of eight burners, for perhaps 1/2 to 2/3 of a 40" stove. I might even be able to find a pair used, locally.
Is there any reason why this shouldn't work? I assume that it can't be that difficult to install a wye to split the gas line...
Labels:
appliances,
kitchen,
our house,
stoves
Subscribe to:
Comments (Atom)
