Showing posts with label our house. Show all posts

Monday, December 7, 2009

A finished roof and an update, finally

Copper roof repair, finished!

I haven't posted here in a while because there hasn't been much going on around the house. The roof repairs are done for this year. I'm really pleased with the job that Dennis Crookshanks did on the job. There was a large section of slate that showed evidence of several different repairs in the past. He replaced it with flat-seam copper and installed ice guards. He also replaced some of the slate on the breezeway and replaced the flashing there, too.

Copper Roof, finished!

The flat-seam copper really looks great.

Of course, now I'm seeing all the other flashing work that needs to be done - one project at a time, I guess. Given the build quality of the rest of the house, I'm surprised that they used galvanized flashing instead of copper.


There's another reason why I haven't posted on here in a while. I've been working on another project, Cleveland Area History. I've been writing about all sorts of things relating to the history of the greater Cleveland area. I toured the house where Langston Hughes lived during his sophomore and junior years of high school. I've talked about two of the oldest houses in the area, one in Cleveland Heights, the other in Cleveland. I've illustrated a National Register of Historic Places historic district. And there's more. Check it out.

Thursday, October 22, 2009

Tiny attic windows of DOOM!

Dormer

One of the last city point-of-sale violations that we have to address is replacing the broken glass in this window. It's a tiny dormer window on the third floor, on the front of the house. Actually, we have to replace the broken glass in two of these windows, as the city didn't note which one (perhaps one has broken since they recorded the violation) and I know that when the inspector shows up, he's just going to see the broken one.

Our house!

The windows don't look so bad - just another couple to reglaze - until you realize how high up they are. One option, working on them from the inside, was out of the question because of the lack of space to work and the relatively small window opening - the glass is just 8.5 inches wide. Once you take into account the framing of the dormer, it doesn't leave much space to work.

Front of the house

I considered renting or buying a large extension ladder. The ladder I have right now reaches comfortably to the edge of the roof, but not much higher than that. The positioning of such a ladder concerned me. I realized that the angle the ladder would have to be at to get to the window would be such that it would be difficult to properly secure it.

If I wanted to use ladders to get to this window, the best option seems to be to have one ladder to get up to the roof and then a second one resting on the roof, held in place with a couple ladder hooks over the ridge. I don't think that I'd be comfortable working up on the roof like that - while I'm ok with using the ladders, once I'm up high on them and things start moving, I get nervous. I worry that the movement of my tools will jostle the ladder and cause it to fall.

I talked to the guys at the local rental place, Handy Rents about renting a lift. The cheapest one that they had would be $170 a day. Once I heard the price, I suddenly felt a lot more willing to spend quite a bit of time in a small, cramped, space, trying to chisel away at the glass from the inside.

I'm finally almost finished removing the glazing from the first of these two windows. Rather than describe the process I went through, I'll instead describe how I plan to do the next window, based upon what I've learned so far.

First, I'll do my best to try to use the torch to soften up the glazing. This will be a challenge and will likely be only partially successful at best, as I won't be able to see exactly where I'm trying to hit with the torch from the inside. It should help some of the glazing to come out when I break up the glass. Then, I'd tape the glass, on the outside and the inside, with packing tape, because it's hard to catch every single little bit and the fragments tend to bounce down the roof. I'll hold a box lid from a file box underneath it and break out the window with a hammer. Once the glass in thoroughly broken, I'll remove it, to the best of my ability.

Next, the fragments of glass that are left will be taken out with a hammer. At this point, with the access that I now have through the space where the glass used to be, I'll use the torch again, to do a more complete job of heating up the old glazing. Then I'll chisel under the glass, trying to get the pieces out. Part of the trick here is to realize that you don't have to see what you are doing. One can, very carefully, work by feel instead. I'll take a methodical approach, chiseling the glazing out, to the best of my ability to feel it.

This won't get absolutely all the old glazing out. It's near impossible, given the work angles involved, to apply sufficient leverage to do so. I'm ok with this - hopefully the glass will stay in place.

Finally, I'll lay a new bed of glazing for the glass to sit in, install the glass, and then begin to glaze the window, reaching around the frame. The work won't be as clean as I would like, but it's high enough up that it won't be seen.

Leather work gloves are a necessity for this project. A very short chisel would be quite useful, given the cramped workspace.

Tuesday, October 6, 2009

Re-glazing Steel Casement Windows

I've replaced the glass in enough wood windows that I feel reasonably competent with it. The old glazing usually comes out easily, because a little bit of humidity always manages to get into the wood. The putty never looks quite as clean as I would like, but it does the job.

Steel casement windows are a different matter. The existing glazing tends to be rock solid and impossible to remove. It was so difficult that I resorted to removing one of the windows and taking it down to my workshop to chisel away at. This took forever and resulted in many small glass chips.

Finally, someone told me to use a torch to heat up the glazing. The heat softens the putty and makes it quite easy to remove. Unless great care is used, the difference in temperature will crack the glass, but since the glass is usually already broken, that shouldn't be an issue.

With a torch, I was able to replace one of the panes from up on the ladder, without having to fear for my life. It is a worthwhile expense, especially given the number of panes that I will eventually have to replace. The fancy new torches with electronic ignitions are quite nice, too.

Monday, September 21, 2009

The library is finally mostly done!

Library view 2

Remember back in February when the leak from the seal on the toilet in the second floor bathroom led to us tearing down the ceiling in the library? Remember how the project just had one complication after another after another? Remember the scary looking broken joists? Well, thanks to A. kicking my rear end a bit, it is finally complete. Almost.

I still have to make some crown moulding to fit the space, and I have to put the endcaps on the radiators, but that's little stuff. The room is now usable, for the first time since February! One can walk in there without tracking out dust!

Library view 3

It is at this point that I want to give a big shout-out to Perpetual Renovator. In that post, she discusses a product, Restore-a-Finish, which she has had good luck with in the past. I used it on the floors in the library, which were all scratched up because someone failed to properly cover the floor before beginning demolition and also had lots of water spotting from the previously mentioned leak. The floors don't look like new, but they look a lot better - enough so that I'm no longer in trouble. After using the Restore-a-Finish on the floor, I finished it with Feed-n-Wax.

Now I just have to get to work on fixing the table that my computer will sit on.

Photos taken by the always lovely and tolerant A.

Avoid Paul David Plumbing for anything but plumbing!!

While he is a good plumber, he is horrible as a general contractor! (He also does business under the name "Feldman Mechanical Contractors" or "Feldman Mechanical Contracting".)

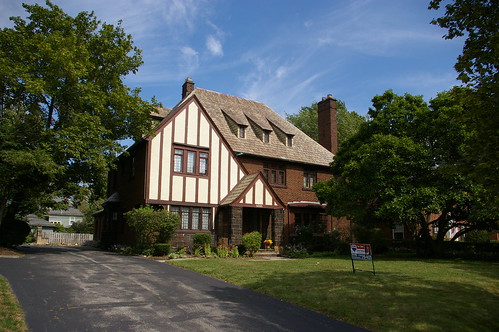
When we hired Paul David Plumbing as our general contractor, it was because Paul David had done good plumbing work at a reasonable price. He was willing and able to deal with the old plumbing in our house, and to do things like rebuild our 1920s toilets.

He has proven himself completely incapable as a general contractor. We paid the deposit for materials, about 65% of the total cost of the job, in April. The contract was entered into with the agreement that a subcontractor with experience in slate would be doing the vast majority of the work, and that Paul David would be doing some work to assist them.

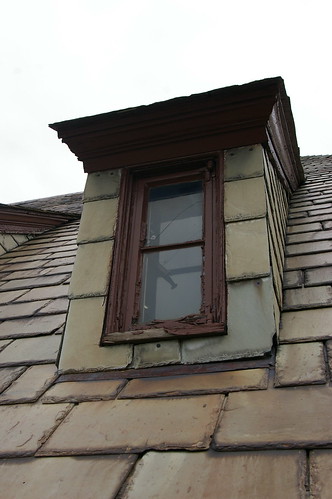
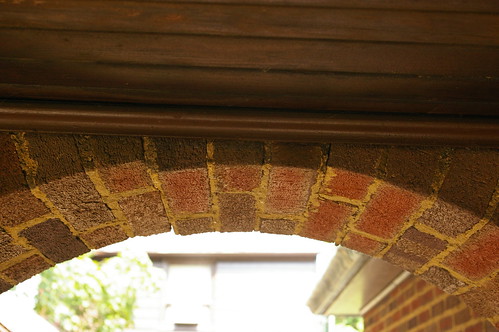
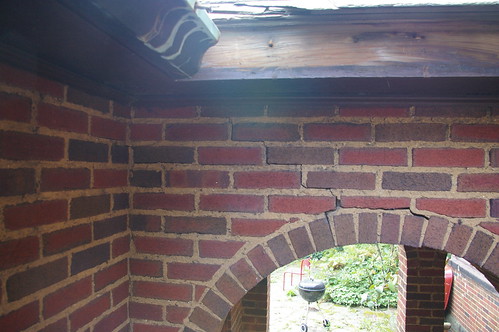
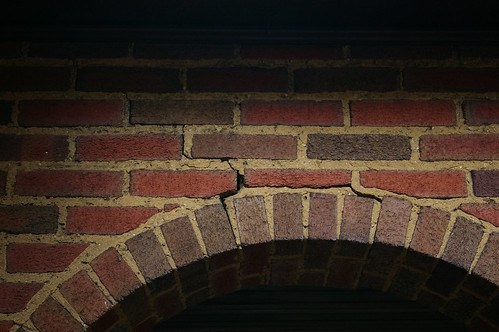
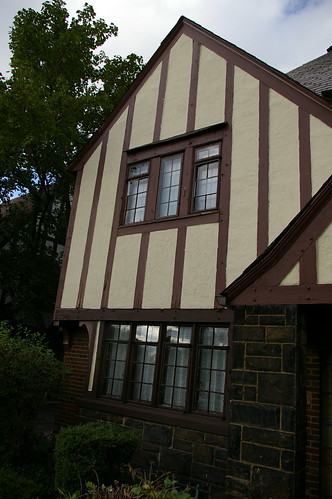
Paul David Plumbing provided us with excuse upon excuse upon excuse why the work had not begun on the roof. Last week, Paul David himself began work on the breezeway between the house and the garage. When one side of the breezeway repair was complete, he asked if we were satisfied with how it looked - I was - but this was based on appearance only. There was another slate that he had replaced, with a nail driven through the face of the slate, which I infomed him was improper practice, and that such repairs needed to be done with a slate hook. Paul David was unable to locate a supplier of slate hooks, which should have been a warning.

Back dormer work done by Paul David

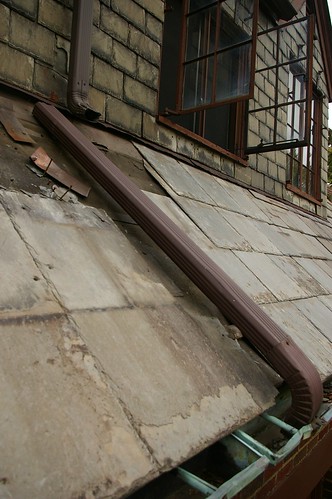
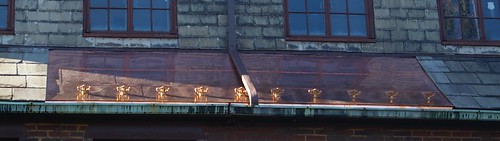
Next Paul David began work on the rear part of the roof, where there had been considerable damage from ice falling on it the previous winter, and where it was obvious repairs had been performed previously. The slate for the bottom few rows are 28 inches long. The slate installed was only 24 inches long, which did not provide sufficient overlap. Paul David did not realize this was an issue until it was pointed out to him. He further didn't realize that the slate needed to be shimmed out, using smaller pieces of slate, to fit the slightly curved framing of the roof.

It was at this point that we realized that Paul David Plumbing had failed to live up to their end of the contract. A professional with experience on slate had not been brought in, as had been specified in the contract. Further, slate adequate for the job had not been provided.

Back dormer work done by Paul David

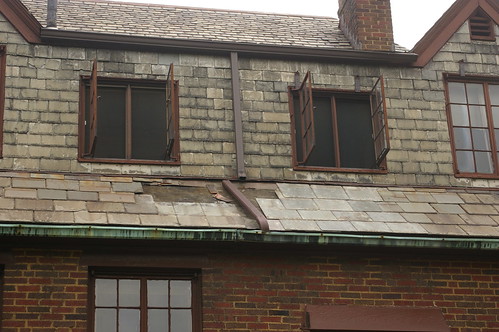
When Paul David Plumbing informed us that the proper sized slate wasn't readily available, we told him that we expected the exposed area and the improperly slated area to be covered to prevent damage from rain, which is expected for the rest of the week. When it appeared, on Sunday, that it was going to rain, we called Paul David Plumbing, informing him of this, asking him to cover the area. He said that he'd try to be out that afternoon. When we called him again, an hour later, when rain was threatening, he said that he couldn't make it and that his insurance would just have to cover it.

That was the absolute last straw. While Paul David may be a competent plumber, he simply cannot be trusted with anything beyond that.

Breezeway work done by Paul David

On further inspection of the breezeway, in the area where work had not yet been completed, I saw that the slate was not installed properly - the nail holes in the slates were not countersunk, so the nail heads will rub against the slate above, eventually wearing through. Further, the flashing at the house is in such poor shape that it really should be replaced. This was not part of the original contract, but something that should have been brought to our attention - it makes little sense to repair the slate now, only to have to take it off in a couple years to redo the flashing.


I took a very long lunch today (and as a result will be working quite late tonight) and met with Paul David to iron out the details of the completion of the contract. By next Friday, he will present us with a list of all the money that has been spent on materials, which will be deducted from the amount we paid, in April, for materials. From his costs will be deducted the cost of a temporary repair on the main roof of the house and repair of the improper work done on the breezeway. If he doesn't provide us with the expenses by next Friday, the amount will be assumed to be $2000. Either way, the amount due back to use will be paid in full by two weeks from that Friday.

I'm not terribly confident that we'll get our money back, but at least now we have everything in writing, and we have some legal standing, I hope.

In good news, Dennis Crookshanks (of Dennis M. Crookshanks Const., Inc.), whose gallery features some pretty impressive work, will be at our house either today or tomorrow to evaluate the situation and install a temporary patch. He clearly knows his stuff - I only wish I'd gone with the estimate that he'd provided when we called him originally. Fortunately, he still has our information on file, so it shouldn't take him terribly long to write up.

Friday, September 18, 2009

Disappointment

We are presently looking to see what our options are for pursing legal action against Paul David Plumbing. He has failed to deliver on the projects that he was contracted to complete, namely repairs to the roof, the chimney, and our gutters, supplying us with excuse after excuse after excuse.

He had said (and I should have specified further in our contract) that he had talked with a roofing firm who was to repair our roof and that he would only act as assistant. Now, with excuse after excuse, he's begun the work on the roof, himself. First he completed some work on the breezeway, which acceptable. Then he began to work on the main roof of the house. The slates that he had ordered were not long enough for the job, but he did not realize that. As a result, as installed, they do not have sufficient overlap. Further, the framing of our roof curves out, and the proper slate shims were not installed to avoid stress upon the slate.

This guy doesn't know what he's doing. He's taking forever. Right now, there's a big open chunk on our roof and we're screwed.

I bring up these issues and he just comes up with one excuse and then another. It's always going to be done in just a couple days, just a couple days more.

I just don't know how to handle all this. I'm freaking out because I feel I have no options. I'm not going to be able to meet the deadlines that the city has set for addressing the violations on the house, and I'm going to have a big hole open on my roof all winter.

On the plus side right now, and this is really the only thing on the plus side, the first gutter that was sent out to be repaired was returned today, and looks great. The gutter is copper, and they were able to roll out all the dents, thus that it looks like the rest of the gutters, or perhaps a bit better.

Tuesday, September 15, 2009

Finally, an update!

It's been forever since I've actually written anything about the house - this is mostly because the house projects are moving forward at a snail's pace. My general contractor has been moving at the speed of molasses and I haven't felt too motivated myself recently.

The contractor has finally started work on the slate, and I'm told that one of the new gutters will be here today, I think - I'll believe it when I see it.

I've finally finished the drywall on the ceiling in the library - I hope to start working on the crown moulding in there tonight.

Further, I've learned something that I wish I knew earlier. It can be just about impossible to get the old glazing out of steel casement windows - unlike wood windows, there seems to be less chance for humidity to get into the space between the glazing and the frame - so the glazing is often rock hard. I learned that a bit of heat, from a torch, will soften the glazing up enough that it comes out quite easily!

Hopefully I'll be able to make a post later this afternoon illustrating all the progress on the house.

Saturday, August 22, 2009

The arch is falling! The arch is falling!

or:
Maybe we've just been in denial all this time

Fallen arches

When we got back from our vacation, we saw this brick hanging down, which we knew wasn't good.

Fallen arches

Upon further observation, the crack seemed to extend to the wall of the garage.

Breezeway between house and garage (detail)

We were sure that this was mostly new, perhaps the result of the big wind storm a couple weeks back, until I looked at this photo, taken in September, when we were first looking at the house.

I think that the loose chunk of brick may have settled a little bit. However, I no longer feel that I can blame the replacement of the garage floor and the theoretical shifting of the walls on this. Nope. Just regular old settling and time.

Since I took these photographs, I've jacked the bricks back up into place, awating the inevitable repairs that will surely come.

In the second photograph, you can see where the section of damaged gutter has been removed so that a proper replacement may be fabricated. Note that the wood underneath the gutter was never painted, yet remains in excellent condition. This is why you want to save the original woodwork when possible - the old growth wood that they used is rock-solid, and can often last forever with minimal care.

Friday, July 31, 2009

Would you rather have our house or another freeway?

lead

The good folks at the Cleveland Memory Project at Cleveland State University have digitized another gem, Cleveland's Forgotten Freeways.

overview

Of note is the Lee Road Freeway, which would have gone right through our house. It can be seen in bold on this map of the greater Cleveland area.


The introductory letter, dated 4 October 1966 states: The suggested location and design for the freeway are believed to be compatible with the present-day social developments of the communities involved and, more importantly, a pre-requisite to their continued economic and cultural well-being in the future. Read: it'll make it easier to flee to the exurbs.

clark freeway

Another part of this massive highway plan, the Clark Freeway, brought the surrounding communities together in opposition. The freeway, shown in bold above, would have cut right through the center of the Shaker Lakes, ruining this last vestige of nature in the adjoining inner-ring suburbs, Cleveland Heights and Shaker Heights.

lee 2

In this map, one can see the freeway over what would have been the former location of our house, and to the right, the interchange over one of the Shaker Lakes.

lee road 1

This detail map shows more clearly the exact route through my neighborhood. It would have destroyed the walkability of the community. Note the presence of the off-ramp dropping all that traffic right in front of the junior high (now elementary) school. This is a community where the kids walk to school. What the heck?

There was an alternate route that was also offered and which wouldn't have involved the demolition of our house. Here's the detail map. See. Not quite so awful. We'd just be living right next to the freeway. That's what this neighborhood needs, after all. Nevermind that we have better access to light rail service than any other community in the greater Cleveland area.


To me the most interesting part of the alternate route is the aerial photograph of my house. It seems that our driveway and our neighbor's driveway, which are shared, had a fence between them at the time. Also, our patio wasn't quite so big.

Thursday, July 23, 2009

Avoid my house

Avoid this area

Yes. Avoid my house. I'm not sure why the Plain Dealer is so certain that my house should be avoided, but that's clearly what they are saying.

Oh. They mean that whole area, not just my house, as they seem to indicate. Even worse.

Tuesday, July 21, 2009

Because they had to build the house in the most expensive way possible

Front

One of the point-of-sale violations the city is requiring we fix is the peeling paint on the trim and stucco on the front of the house.

The faux Tudor elements are not in good shape. I've found it difficult to scrape without gouging, due to the slightly damp surface of the wood. Water has somehow been getting underneath the paint, even in places that are a significant distance from cracks in the paint. I'm not sure if this is because some of the boards are bowing up at the ends or if it is because moisture is getting in some other way.

I somehow ended up scraping a nice, clean, dry, area. This was probably to even out some edges and because I had an über sharp scraper. The wood underneath looked great. Further, it looked like it had a layer of varnish on top, which seemed curious, but didn't really register.

Dining room

The lone bit of good wood appears to be walnut. The color of the varnish would make it about the same shade as the house's interior woodwork. At first, I figured that there had been a leftover board and that they had used it on the exterior. Then I saw that some peeling paint by the windows revealed similarly varnished wood.

I'm now reasonably sure that the trim on the front of the house was originally unpainted walnut with a relatively light varnish. While this might have looked quite interesting, the lifespan was obviously quite limited.

The vertical boards in the first photograph will have to be replaced eventually. There is simply too much damage to the wood. There's no way to bring them back to their original appearance without an insane amount of work.

The question then comes as to what to do when replacement time comes. I'd like to have the house trimmed as it was originally, with unpainted wood trim. I imagine it would look quite interesting, and distinctly different from every other Tudor in the neighborhood. With the heavy duty varnishes that are available today, there might be one that would hold up long enough to keep me from going crazy re-varnishing every few years.

I'm going to look into this. I suspect my search will lead me to a wooden boat supplier. As always, I welcome thoughts on the insanity of this all.

Monday, July 20, 2009

We have a garage floor!

concrete has arrived

Today, the cement truck came.

concrete being spread

They poured the garage floor.

fresh cement

Look how nice and smooth the garage floor is.

drainage grade

Note the slight grade, so that the floor will drain properly.

Once its dry, they'll cut the stress lines. In a week, we'll be able to drive on it.


Photographs by A.

Because I don't seem to be very good at photographing the house

where's dad?

The dining room, with my son in the foreground.

Photo by A.

Wednesday, July 15, 2009

We'll be able to park our cars in the garage?

prepped for cement

The garage floor is all ready for the cement pour. We've been told it will happen on Friday. Here's hoping! It'll be nice to be able to put our cars in the garage. Rather, it'll be nice to be able to put one of our cars and a bunch of junk in the garage.

Photo by A.

Making progress on the guest bedroom

Robin's Egg - guest room
Before

Coral Cream - guest room
During

Chris pulling carpet staples out of the floor
Almost done

The painting was mostly done by A - I did the finish work. The third photograph is the more accurate representation of the color.

We'd peeled up the corner of the carpet during our first walk-through of the house and found that the flooring was in excellent condition. I've pulled up the tack strips and all the staples - now all that remains is to scrape off the remaining bits of padding and scrub the floor.

The padding, by the way, is really nasty.

Yes, that is a near-mint, framed, Star Wars one-sheet, style C, sitting on the bed. Ah, how tastes change.

Photographs, of course, by A.

Tuesday, July 14, 2009

That electrical supply line really had to go...

old supply line to the house

This is the old electrical line that brought the power from the service entrance, through the garage, under the breezeway, and into the house. Note the lack of insulation and the lovely patina. Note that the patina is on the ground. Yes. The ground. Ack.

corroding electrical cable

In this detail, note the frayed state of the ground. Note that it has been arcing against the conduit it is running through. ACK.

Finally, note that these photos were taken by A.

Tuesday, July 7, 2009

Garage floor

central drain in garage

The garage floor is taking longer than expected. Either today or tomorrow the drain, shown here, will be replaced with one that isn't damaged.

inside the asbestos pipe in the garage

The building inspector also said that we have to run the wiring here, with the lovely exposed ground, through conduit. This means that we will be replacing the wiring from where it comes out of the panel in the garage all the way to the subpanel in the basement. This is another $1500 that we hadn't planned on. That price includes the wiring for 100 amp service and running additional conduit next to it for the future upgrade to 200 amp service.

Photographs, of course, by A.

Saturday, June 27, 2009

The internet is for corn!

(or: Knee high by the 25th of June!)

knee high before the 4th of July

Given our very late start, I was quite surprised that the corn reached knee high by the 23rd or so of June. Especially given that my knees are rather higher than average.

Photo by A.

Thursday, June 25, 2009

Our Garden

Our garden

Our garden is doing incredibly well this year, especially considering how late we (read: A.) planted everything. The corn was knee high by the 23rd of June. This translates to waist high for most other people.

Squashes and melons

We've got melons and squashes.

Garden

There are beans, okra, and onions in the foreground, as well as horseradish, rhubarb, and two varieties of peppers that don't seem to be doing anything. In the midground are four varieties of tomatoes. The back patch includes two types of corn and beans. It also has what I strongly suspect to be garlic.

Lettuce, carrots, potatoes

In this patch are lettuce, carrots, and potatoes. Off to the left, one can see the multi-grafted fruit tree, which seems to finally be doing well.

Most surprising about all this is how late we were in planting - most of the seeds have only been in the ground 30 days, and none of them (except for the two watermelons) were transplants.

Finally, an update!

Day lillies and the neighbor's garage

Day lillies and our neighbor's garage, at sunset.