Showing posts with label exterior. Show all posts

Tuesday, July 21, 2009

Because they had to build the house in the most expensive way possible

Front

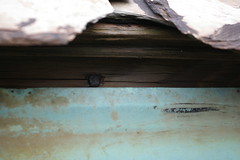
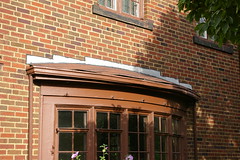
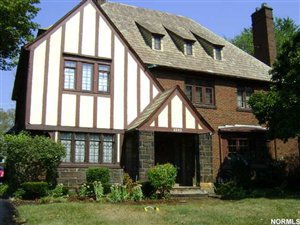
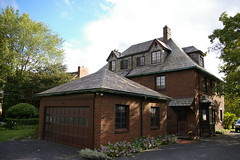
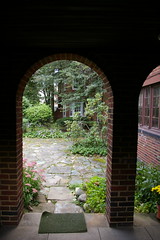
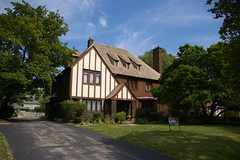
One of the point-of-sale violations the city is requiring we fix is the peeling paint on the trim and stucco on the front of the house.

The faux Tudor elements are not in good shape. I've found it difficult to scrape without gouging, due to the slightly damp surface of the wood. Water has somehow been getting underneath the paint, even in places that are a significant distance from cracks in the paint. I'm not sure if this is because some of the boards are bowing up at the ends or if it is because moisture is getting in some other way.

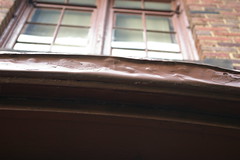
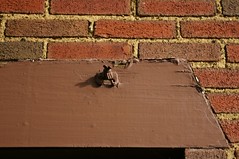
I somehow ended up scraping a nice, clean, dry, area. This was probably to even out some edges and because I had an über sharp scraper. The wood underneath looked great. Further, it looked like it had a layer of varnish on top, which seemed curious, but didn't really register.

Dining room

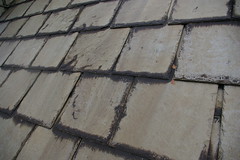
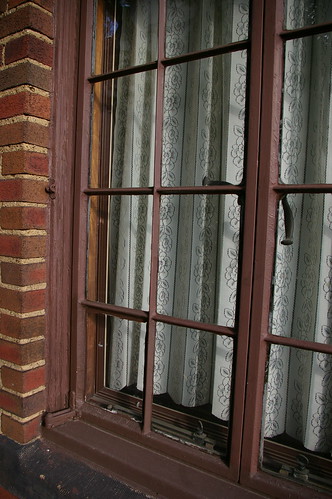
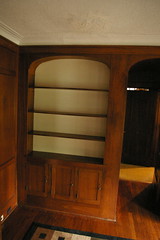
The lone bit of good wood appears to be walnut. The color of the varnish would make it about the same shade as the house's interior woodwork. At first, I figured that there had been a leftover board and that they had used it on the exterior. Then I saw that some peeling paint by the windows revealed similarly varnished wood.

I'm now reasonably sure that the trim on the front of the house was originally unpainted walnut with a relatively light varnish. While this might have looked quite interesting, the lifespan was obviously quite limited.

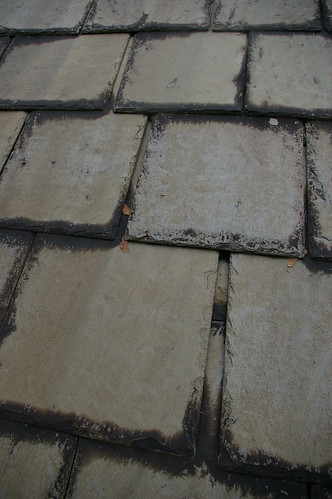
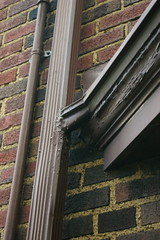
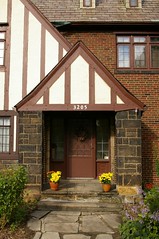
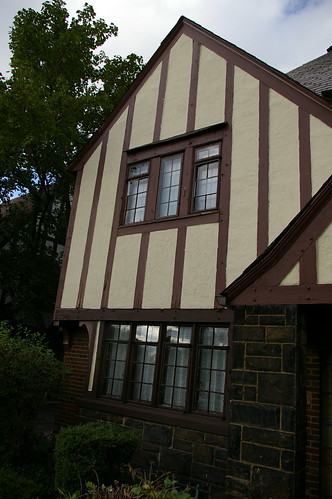
The vertical boards in the first photograph will have to be replaced eventually. There is simply too much damage to the wood. There's no way to bring them back to their original appearance without an insane amount of work.

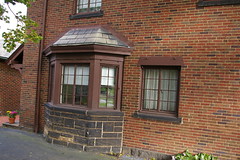
The question then comes as to what to do when replacement time comes. I'd like to have the house trimmed as it was originally, with unpainted wood trim. I imagine it would look quite interesting, and distinctly different from every other Tudor in the neighborhood. With the heavy duty varnishes that are available today, there might be one that would hold up long enough to keep me from going crazy re-varnishing every few years.

I'm going to look into this. I suspect my search will lead me to a wooden boat supplier. As always, I welcome thoughts on the insanity of this all.

Friday, March 6, 2009

More roof photographs

Front of the house
I actually got some decent looking photographs of the roof yesterday. This one happens to illustrate the chimney and a couple broken slates as well.

Gutter detail, south side of house
This is the area behind the gutter. Note the utter lack of paint. This appears to be the case all the way around the house. Note also that the gutters are soldered together at the seams, which will make removing them somewhat difficult. Ugh.

Entryway ridge
This illustrates why it is not a good idea to use aluminum for ridges on slate roofs. Copper or galvanized steel is sturdier.

Weird overlap pattern?
Finally, here's something that I just don't understand at all. If you look at this picture, you'll see, in the first row of slates, two slates that have a wider gap than might normally be expected. In those gaps, you can see what appears to be a short slate. This does not make sense to me. Kurt? Anyone?

IMGP6626
Here's a slightly better detail. It occurs in several spots on this, the west side of the roof, across several rows. I can't imagine that these are the result of broken slates being repaired, but I can't think of anything else that it might be, either. Surely there's something that I'm missing here.

Wednesday, November 5, 2008

A very tentative and ongoing to do list

This list is but a start, of course, and there are definitely many things on here that won't get done any time in the near future. I like making lists, and this provides me with a way to stay sane.

General
  • Replace all incandescent bulbs with CFLs.
  • Find a better solution for storm windows and screens
  • Strip and repaint every window
  • Paint every single exterior item the same brown
  • Rewire house


First Floor

Kitchen
  • Get stove repaired or find suitable vintage replacement
  • Remove stickers and grime from stove
  • Remove blinds from back door. Patch holes.
  • Repair or replace crank doorbell on back door.
  • Determine how much, if any, backsplash is needed, given the presence of tile. Determined - no backsplash needed
  • Regrout loose floor tiles by back hall
  • Remove scuff moulding in front of stove and replace with less ugly.
  • Find and install fixture to replace main light
  • Find and install fixture to replace light over breakfast nook
  • Build bench for breakfast nook
  • Fabricate and install drawer stops
  • Replace counter tops with butcher block
  • Add counter top above sink where ledge is presently, to accomodate sitting persons at bar stools
  • Find and install a nice white cast-iron sink.
  • Replace screen door with more appropriate one
  • Replace hardware holding handle on laundry chute with something that won't snag the clothes
  • Relocate laundry chute door either up or down to accomodate counter.
  • Add water line to refrigerator
  • Relocate phone line from wall by bar sink to wall by laundry chute
  • Remove wall by bar sink and finish
  • Find more sympathetic hardware for cabinets under bar sink
  • Remove soffit in areas where there are no cabinets and it is not needed
  • Install some sort of barrier between radiator and dishwasher
  • Remove roller blinds and replace with something better - perhaps functioning roller blinds?
  • Locate and install missing endcaps for cabinets
  • Remove outlet strip behind stove and add two outlets, one on each side of stove
  • Strip paint from tile
  • Remove door for incinerator and replace tile


Half bath
  • Remove linoleum and clean up floor. If tile is still present, repair. If not, consider penny tile to match existing on second floor.
  • Remove mirrors on walls and ceilings. Repair plaster as necessary.
  • Obtain and install more historically appropriate faucet
  • Clean paint from door handle and associated hardware


Rear entry hall
  • Replace off-white light switch with either white or black, and if black, with found chrome switchplate
  • See if it might be possible to raise ceiling an inch or two, if drywall were used, and if possible, do so. Otherwise sand down spikey stucco


Library
  • sand down stucco on ceiling, perhaps redo
  • Fix cabinet doors to open and close properly
  • Locate key for locks in cabinets
  • Remove existing window treatment and replace with one more sympathetic to the room and house


Living room
  • Remove wall to wall carpet
  • Resurface radiator cover
  • Remove paint from fireplace
  • Prep, repaint ceiling a non-shiny color
  • Find nice landscape painting to hang over fireplace


Dining room
  • Remove plant hooks over front window
  • Remove wallpaper and paint walls a similar color to blue in wallpaper
  • Obtain glass hand plates for swinging door
  • Replace chandelier with more appropriate fixture
  • Remove metal radiator cover. Consider building wood radiator cover, perhaps in the form of a window seat.
  • Sand down textured plaster on ceiling.


Entry hall
  • Remove linoleum and repair floor as necessary
  • Remove wallpaper and repair / paint walls
  • Fabricate missing piece of chair rail
  • Secure loose railing
  • Etch pattern into replacement pane on hall light fixture
  • Re-do filler on door to back hallway. Faux paint as necessary


Screened in porch
  • Remove fan of doom and replace with sane light fixture
  • Build rack to store firewood on
  • Replace screen, if it seems that it will make a difference as to the amount of light coming into the house.
  • Research if it is possible to remove paint from brick without destroying it (signs point to no) and, if so, remove yellow paint from brick on porch walls.
  • Make round trim pieces for rounded parts of screen
  • Clean paint off stone
  • Strip and repaint exterior trim
  • Rebuild stairs outside porch
  • Remove "dog door" and replace with screen


Second Floor

Master bedroom
  • Find and replace existing sconces with something more suitable
  • Determine purpose of thermostat
  • Smooth out spikey stucco
  • Locate and install better window treatments


Master bathroom
  • Remove bare bulb in shower, replace with humidity-sealed can
  • Raise shower ceiling to height of rest of room
  • Locate CFLs to replace bathroom lights
  • Obtain and install missing shower knobs
  • Find and replace tub faucet and knobs
  • Find and install replacement tile for shower pan
  • Locate and install replacement toilet to match others in house
  • Remove ugly cup dispenser
  • Remove ugly hooks
  • Find and install more suitable shower door
  • Adjust linen cupboard to close properly
  • Find a better shower head
  • Clean out "needles" so that all spray properly
  • Find and install replacement faucet for sink
  • Strip paint from hinges on built-in
  • Remove ugly window covering, fill holes left in tile
  • Re-grout badly re-grouted tiles
  • Install ventilation fan
  • Install slightly longer chains for light fixtures


Craft room
  • Remove paint from knobs
  • Either remove ceiling moulding or do better finish work
  • Find and install better window treatments
  • Find and install better ceiling light fixture


Other bathroom
  • Install GFCI circuit breaker for bathroom
  • Secure loose tile
  • Remove ugly cup dispenser
  • Remove ugly hooks
  • Find replacement tub faucet and knobs
  • Find a better shower head
  • Replace faucet and handles on sink with more appropriate ones
  • Re-grout badly re-grouted tiles
  • Consider relocating light switch into door frame (but installing a GFCI breaker should resolve any issue that this may cause...)
  • Install ventilation fan
  • Remove wallpaper and refinish walls


Hall
  • Replace fuse box
  • Remove wallpaper
  • If rewiring efforts require cutting ceiling holes, replaster entire hall ceiling


South bedroom
  • Remove carpet
  • Remove mirror from bedroom door
  • Remove ugly blinds and replace with more suitable window covering


Southwest bedroom
  • Remove carpet
  • Paint walls a single color
  • Replace roller blinds with a more suitable window covering


Northwest bedroom
  • Remove carpet
  • Repair/replace doorstop
  • Strip paint from hinges on built-ins


Third Floor

Main room
  • Remove faux-Tudor elements by windows to allow better access
  • Insulate
  • Raise railing to a reasonable height
  • Add built-ins for storage - make space for flat files


Bathroom
  • Remove wallpaper in bathroom
  • Remove ugly light fixture in bathroom and replace with something more suitable
  • Replace off-white GFCI outlet with GFCI outlet
  • Replace toilet with historically correct toilet
  • Remove wallpaper in bathroom


Basement
  • Repair pipes with holes
  • Repair wall on stairs going down to basement
  • Move dryer to less awkward location and see about possibility of routing exhaust into chimney.
  • Clean paint off good slop sink faucet.
  • Re-locate light fixture at bottom of stairs
  • Remove freezer
  • Replace hot water heater with tankless
  • Replace breaker box
  • Remove carpet
  • Paint ugly paneling or replace with plywood and drywall.
  • Remove ugly cover from toilet
  • Find white toilet seat to match.
  • Strip paint from door hardware in basement.


Exterior

All around
  • Tuckpointing
  • S1ate repair
  • Repair of casement windows, especially rust and window frames
  • Painting everything on the exterior the same shade of brown
  • Replace rusting gutter nails with either copper or stainless steel
  • Redo all ugly Portland cement repairs lime mortar


Front
  • Remove screen door
  • Find suitable replacement doorbell and install
  • Remove ugly doorbell from door and fill as necessary
  • Replace wood in front door with glass
  • Replace screen door with wood one or simply discard
  • Remove ugly light by front door, replace if necessary
  • Replace incorrect downspouts on living room bay window with appropriate
  • Repair faux-Tudor boards
  • Repair front gutter
  • Replace roof on living room bay window with copper
  • Replace aluminum gutters on front entryway with copper
  • Remove paint from stone on front entryway
  • Remove paint from stone windowsills, including the dining room windows, which have been completely painted.
  • Level steps in front of house


Driveway side
  • Paint box gutter on bay window
  • Strip paint off copper on bay window, both on flashing and on box gutter


Chimney side
  • Tuckpointing
  • Prune tree/bush by screened in porch to allow more light into porch
  • Build chimney saddle and rip out existing flashing and re-flashing


Rear
  • Fix second floor porch floor - rip out existing floor, remove beadboard underneath and see what structural work has to be done, replace floor
  • Replace flashing on second floor porch
  • Fix gate under breezeway
  • Re-route television cable in more aesthetically pleasing manner
  • Fix/rebuild gate
  • Excavate and rebuild window wells (pushed in by freeze-thaw cycle)
  • Apply WD-40 to exterior faucet handle in attempt to unfreeze
  • Remove extra television cable over library window
  • Determine what, if any, the original gutter configuration was for the third floor dormer. The current gutter and downspout just doesn't feel right. Perhaps the issue is snow and snow dams would help?


Garage
  • Replace cracked pane on garage door (car entry side)
  • Replace plexiglass pane on garage door (car entry side)
  • Replace plywood in door with glass (human entry side)
  • Determine why garage door frame has gaps / is out of plumb and remedy.
  • Repair / replace trim piece on garage by car door.
  • Replace garage slab
  • Replace breaker box
  • Fix gaps around garage door
  • Fix light on side of garage to hang level
  • Find historically correct light for over garage door. Once installed, remove ugly motion-sensor light from garage corner. Leave motion sensor system and use with old light if necessary.
  • Replace valley between breezeway and garage
  • Apply WD-40 to exterior faucet handle in attempt to unfreeze
  • Rebuild basin for fountain on exterior of garage.


Yard
  • Remove basketball backboard
  • Remove dead elm on side property line
  • Remove dead elm on back property line
  • Remove or repair half-broken grill
  • Sealcoat driveway
  • Research whether it would be possible to have electrical, phone, and cable lines run through ground between utility pole and garage. If so, consider doing this, given relatively low (8') height of entrance at garage.
  • Obtain cheap sandstone to eventually replace broken parts of front sidewalk.

Monday, October 27, 2008

Two bay windows

West (driveway) side

This bay window is on the driveway side of the house. It is theoretically a breakfast nook, though there really isn't space in the kitchen for the table that that would entail. It has a box gutter, lined with copper, which has been painted brown. The flashing, likewise, is copper, and has been painted brown. It should look even more lovely once the paint is removed.

Bay window gutter detail

Note the curious manner in which the gutter attaches to the downspout. I'm not sure how this might have been installed originally. The downspout is definitely a later replacement, of aluminum.

Living room window

This bay window is on the front of the house, on the living room. I suspect that the roof may have been copper, originally. The gutter was hand-fabricated to fit the form of the curve. It has taken a bit of a beating (see detail, below), however, it still does its job well. The downspouts are clearly later replacements - I suspect that the originals had a bit of a return on them, though I have been unable to locate mounting locations for them.

Living room gutter (detail)

Thursday, October 23, 2008

The Trials and Tribulations of Steel Casement Windows

Kitchen window

We are fortunate that the house retains all of the original steel casement windows. Even more fortunately, they all seem to be in good operating order.

My issue is with the storm windows and screens. They are all aluminum framed replacements, some installed on the exterior, and some, as shown below, installed on the interior.

Window, west side of house

Window trim detail, west side of house

Originally, it seems that the storm windows were mounted with this hardware. The storms are long gone.

At present, to open or close a window, one must remove the 8-10 screws holding the screen in place. This is ridiculous.

Another house we looked at, of similar vintage, had wood casement windows. The screens and storms were also wood framed, probably original, and were mounted on the inside. The screens had a small hole in the frame, at the bottom, to allow a crank to pass through, to open and close the window. This simple solution seemed so brilliant to me at the time - I've since learned that it's not uncommon.

I can't see a way to apply that solution to this house - it seems that it would require a major expenditure on new hardware that probably wouldn't look right. I'm also not interested in roller screens - while they may have been there originally (I haven't investigated fully, but I'm pretty sure I haven't seen any remnants of them) they're a pain in the neck to use.

I'd love to hear any thoughts or experiences with screens and steel casement windows that might be useful.

Wednesday, October 22, 2008

Finally, photographs!

Due to popular demand, I'm going to share some photographs of the house we are purchasing.

01
Somehow, the only photograph I have of the front of the house is from the listing.

Front entrance

Rear view
Rear, with semi-attached garage.

Walkway between house and garage

Stairs
Entrance hall and stairs.

Dining room
Dining room.

Living room
Living room. The fireplace is stone of some sort, and has been recently painted. I don't think the carpet will be there long either.

Kitchen
The kitchen has some nice 1950s steel cabinets. The while tile has, in fact, been painted. I'm curious to see what color it actually is.

Kitchen Kitchen

Kitchen

Library
The library.

Work sink, laundry room
This sink might not seem so impressive, until you note that it is cast iron.

Master bathroom Built-ins, master bathroom

Shower enclosure, master bathroom

Master bathroom
The master bathroom is in remarkably original condition, although the toilet and sink were replaced at some point. The floor tiles, rather than the usual squares or hexagons, are round. Note the nice border near the top of the room. Finding the missing handles and parts for the shower is going to take a long long time (or a lot of money). The one original handle is for the "needles".

Built-ins, northwest bedroom
Built-ins, in one of the bedrooms.

Third floor bathroom
The fixtures in the third floor bathroom appear original, except for the toilet. I'm slightly tempted to move the basement toilet up here, to have one completely originalish bathroom.