Last night, with all my paperwork in hand, I did my federal and state taxes. I spent a record amount ($130) and completed them in record time (3 hours). This morning, I got an email stating that my federal return had been accepted.
I had seriously underestimated the amount of money that we would be getting back this year. I'd never changed my withholding status from single at my old job, because the paperwork was too much fuss, and we had Everett this year, and moved, with all the expenses involved with that. Finally, we bought a house. While the money from the first-time homebuyer tax credit is technically a loan, it's an interest-free loan, so it's virtually free money.
My jaw dropped when I saw the total amount of our refund. A reacted in about the same manner. All sorts of possibilities started running through our minds. Namely, we'll be able to get all the necessary work done on the roof this year! And maybe even a working stove, too! Perhaps a new boiler could be added to the list! Or perhaps a tankless hot water heater! We're rich, rich I tell you!
Thursday, February 26, 2009
Tuesday, February 24, 2009
Need a book on rehab plumbing and electrical
There are many fine books out there on plumbing and electrical work. There are even some good ones on how to do things properly when you remodel - I'm especially fond of the ones from the Taunton Press. However, there is a third type of book that I really hope exists.
I'm looking for a book (or any other source) that illustrates how to take the plumbing that is already there and make it work properly. I want to know how to fix the worst of my plumbing and electrical without redoing it all. I want pictures that show electrical situations like mine and how they are resolved.
Any ideas?`
The builders of the house did WHAT?
I muttered previously about the unnecessarily massive notch that the plumbers cut into the joists in the library when they ran new bathroom plumbing in the 1960s. I wanted to figure out why they would do this. It seems that the original plumbers had a less than brilliant idea - they ran the plumbing through the concrete that was used as a bed for the tile in the bathroom. Doh! While this may have made for a more solid structure initially, it didn't take into account that the plumbing would eventually fail and have to be replaced.
Monday, February 23, 2009
It's not quite David Giffels' house...

I like to look for photographs of other houses on Flickr for the same reasons that I enjoy reading house blogs - they provide inspiration, ideas, and a way to see other possible solutions to a given problem. I'm especially interested in other Tudors.

Imagine my surprise when I saw this house, 759 N. Portage Path, Akron, OH, a few months ago. The house is about 3500 square feet, on 3/4 of an acre, just across the street from the most famous Tudor Revival house of all, F. A. Seiberling's Stan Hywet Hall.
At the time, the house was for sale, and the photographer didn't seem terribly interested in making others aware of this great bargain. Now that it has been sold (at the beginning of January, for $120,000), I've contacted the photographer, Andy Flip who has given me permission to post some of his photographs of this great house. I love the way the radiator here is tucked under the stairs.
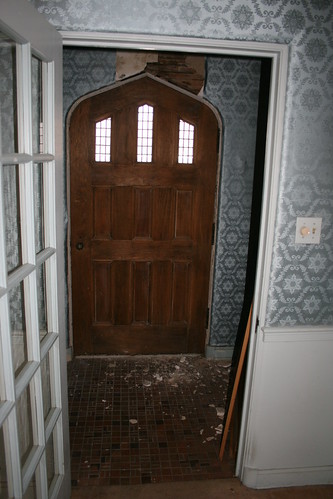
Check out the front door.
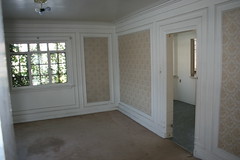
The trim in the dining room is really special. If one had a nice art collection, it would fit perfectly in such borders. Heck, this might be an interesting design idea for a room or two in our house.
The basement bathroom, however, was what really caught my attention. Usually, the basement bathroom is lucky to get four walls. A sink, even, is less than common. So this one, with walls covered in structural glass, (Vitrolite and Carrara Glass were two common brands), surprised me.
Another bathroom also had walls tiled with structural glass, albeit not in as good of condition. The medicine cabinet and sink are also quite lovely.
I'm afraid to ask what happened to the sink here.
I should note that David Giffels, who I mentioned in the title of this entry, is the author of All the Way Home: Building a Family in a Falling-Down House. Giffels' Tudor Revival house is also on North Portage Path in Akron, albeit closer to the center of the city. His book is a great read. Given the choice, I'd take this house over his and deal with slowly rehabbing it over an extended period.
Again, I thank Andy Flip for allowing me to post his photographs.
Friday, February 20, 2009
Perhaps I was a little too smug...
I've gone on and on about how incredibly not messed up our house is. I've talked about how I couldn't find one bit of dodgy electrical work, etc., etc.
Note the massive crack in the joist in the center of the picture. This joist happens to run right underneath the center of the bathtub and the shower pan in the master bathroom. Further, note that there appears to be a chunk missing from the bottom of the joist. At the point that the electrical passes through the joist, it is about 1.5 inches below the next joist over.
I don't have any way to know whether the joist was cracked or if just the piece was missing when the ceiling was replaced and the plumbing work was done, in 1967. Either way, I place the blame on whoever did the work. When presented with a joist that was so compromised, it should have been addressed.
They also saw fit to notch the joists enough to properly insulate the pipes, which resulted in two of them cracking. Further, they stuffed enough fiberglass around the knob and tube wiring to start a good fire, and closed up an electrical box in there as well.
Of course, I shouldn't be surprised by the quality of the plumbing installed by the same individuals. There is corrosion around every single fitting - and in some places where there aren't even any fittings. Not good.
As if this all wasn't bad enough, the framing under the shower pan, which was redone more recently, doesn't look too hot either.
I'd love nothing more than to replace all of this plumbing while we have the ceiling open. However, that simply isn't in the budget right now. What we'll probably end up doing is addressing the structural issues before the ceiling goes back up, use greenboard for the ceiling, and deal with the plumbing when we can.
What was where in the shower?

I'm trying to determine the original plumbing configuration for my shower. I don't plan to do anything about it in the immediate future, mind you, it's just that it doesn't quite make sense and perhaps a few more pairs of eyes can help.
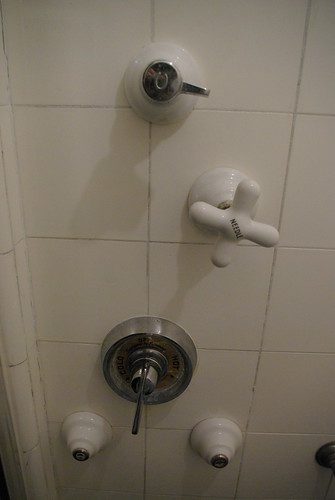
The shower head and needles are almost certainly in their original location. I feel it is reasonable (though don't have any evidence one way or the other) to assume that the knob for the needles is also in its original location. I strongly suspect (though again, without any evidence one way or the other) that the two escutcheons at the bottom were originally for the hot and cold water. The tile behind them appears to have been removed, presumably when the mixer was installed, so I cannot be absolutely sure of it.
The real question is as to what the remaining knob, the one directly above the mixer, would have been used for. Presently, it is fixed in place - I assume that the knob was placed there to cover the valve stem.
My only guess is that the remaining knob was to turn the shower on and off, so that one might be sprayed by the "needles" alone. I presume that it would have been labeled "shower".
The one remaining original handle was made by Republic, so I presume that the remaining handles would have also been made by them. DEA Bath Machineries has a Republic showerhead in stock, for a mere $145. That's not in the budget right now, but it's not utterly insane, either.
I welcome other ideas as to possible plumbing configurations or insights regarding the set up of this shower.
Drawing up floorplans and mechanical diagrams?
I want to draw up a detailed set of floorplans. I also want to clearly illustrate where the electrical wiring and plumbing in the house go, both for myself and for future reference for any plumber or electrician I may hire. I'd like to include every outlet and bit of pipe, so that one can see what is on what circuit as well as which pipe is present that is not in use. I'd love to also include the pipe from our old vacuum system, with the hope of using it as a conduit for wiring in the future, but I know that that may be more difficult, given that most of the outlets for the vacuum system have been removed.
This seems like a good time to start working on such a project. I haven't put any insulation up in the attic yet. I have the library ceiling open, which gives me access to a good deal of the plumbing for the two second floor bathrooms.
The best solution I've found so is to just use large format graph paper to draw the floorplan, with a scale of 1"=1'. I plan to use additional sheets to overlay the mechanical systems. While this requires little additional expenditure, it's not as clean as I would like, nor does it allow for easy editing once I've finally inked everything in. Further, short of doing more drawings, it doesn't allow me to show how the plumbing goes vertically through the walls.
The desire to record all this information may seem slightly excessive. Keep in mind that we plan to be in this house for at least the next 30 years, so the knowledge recorded here will build up over time. Given this, perhaps the best way is to just work on paper, as software can change so much.
I welcome any suggestions on the subject.
Thursday, February 19, 2009
Library ceiling demolition
Demolition for the library ceiling is proving to be more of a challenge than expected. This house was built like a tank. While I'm sure that the celing in this room has been replaced, I'm unclear as to the age of the crown moulding. It is so firmly attached to the plaster, using metal lathe, that I suspect they were installed at the same time, however, I cannot be sure.
The problem with demolition is that the plaster moulding appears to have been made in place. It has a backing of metal lathe, which is held into the wall with nails and mortar. The plaster is built up on top of that.
The plaster is just about bulletproof. With a hammer and chisel, I'm able to make slow progress. If the moulding was in any better condition, I'd feel guilty about tearing it out. As it is, it's merely an annoyance that slows me down.
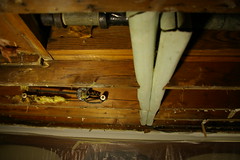
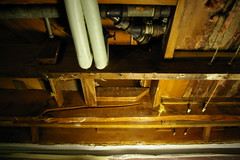
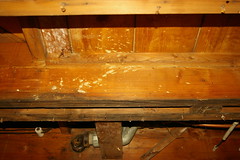
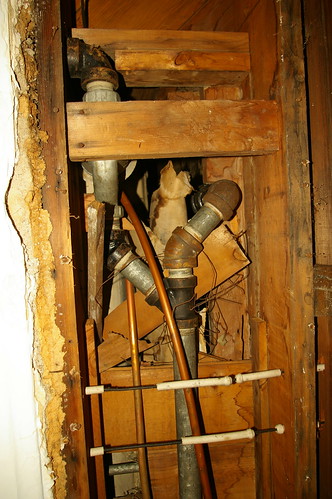
I've uncovered all manner of surprises. The plumbing for the two second floor bathrooms was redone at some point in the past, in copper. Most of solder joints are suspect - they all show at least some corrosion.
There is a joist under the tub in the master bath, that cracked and deflected downward about 1.5 inches. When the ceiling was torn out, they just chiseled a chunk off the bottom of it, rather than supporting it and sistering it up. Ack.
The shower pan in the master bath was replaced by the previous owner. Their choice of tile left quite a bit to be desired. The framing under the pan clearly suffered from the leaking water. Further, a significant part of the shower pan that seems to be supported by a piece of plywood held in place by some randomly placed drywall screws. At the very least, I'll be adding some support there.
The problem with demolition is that the plaster moulding appears to have been made in place. It has a backing of metal lathe, which is held into the wall with nails and mortar. The plaster is built up on top of that.
The plaster is just about bulletproof. With a hammer and chisel, I'm able to make slow progress. If the moulding was in any better condition, I'd feel guilty about tearing it out. As it is, it's merely an annoyance that slows me down.
I've uncovered all manner of surprises. The plumbing for the two second floor bathrooms was redone at some point in the past, in copper. Most of solder joints are suspect - they all show at least some corrosion.
There is a joist under the tub in the master bath, that cracked and deflected downward about 1.5 inches. When the ceiling was torn out, they just chiseled a chunk off the bottom of it, rather than supporting it and sistering it up. Ack.
The shower pan in the master bath was replaced by the previous owner. Their choice of tile left quite a bit to be desired. The framing under the pan clearly suffered from the leaking water. Further, a significant part of the shower pan that seems to be supported by a piece of plywood held in place by some randomly placed drywall screws. At the very least, I'll be adding some support there.
Monday, February 16, 2009
Libraries open up a world of surprises
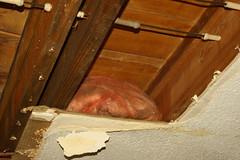
Do you see what I see?
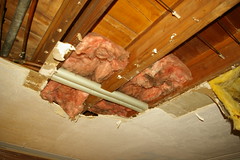
Yes! That's fiberglass insulation! But what is fiberglass insulation doing under this untouched plaster? Right - not so untouched.
I must credit the quality of the plaster work on whoever did the work here - it is really impressive. The ceiling is made of a material that appears to be similar to drywall, only a bit more dense and only about 16" wide. It is about 5/8" thick and runs perpendicular to the joists. The seams on the joists are held together by metal lathe and a layer of plaster about 1/2" thick. If not for the water, this repair work would have been bulletproof. The metal lathe gripped the crown moulding at the edges - there's no way I could have gotten it apart.

Perhaps this fiberglass will help date the work.
I'm really really glad that I tore out the plaster. There was some mold where the water had been sitting. There was also evidence of some sort of small rodent's nest in the fiberglass.

Another concern I will be addressing is this bit of knob and tube - it seems that the junction overheated a bit, probably due to being covered with fiberglass.
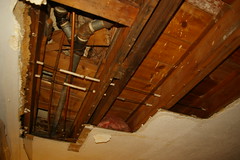
Further, this joist has a disconcerting crack in it - I'll probably be sistering it up before everything goes back together.
I'm not going to ask about the various loose pieces of wood here.
Finally, while insulating hot water pipes is important, I'm not sure that notching joists to this extent is the proper course of action in order to accommodate the insulation.
Insulating the attic

My attic has a problem with insulation - there isn't any. None. (Ok, so there's one poorly installed roll of fiberglass, but that isn't statistically significant.) We knew this was an issue when we purchased the house and it was something that we planned to address after winter was over.
The first step will be to install soffit vents and some way to draw the air through. I'll be interested to see what interesting ideas my roofer may have. One idea I've been playing with (and have no idea as to the practicality) is, when the copper on the ridge is repaired/replaced, to conceal a vent underneath it. I don't like the idea of ugly little vent fans on the roof.
The shape of the walls on the third floor make insualting a challenge. While there's enough space to insulate the vertical walls and the ceiling, the parts of the wall that slope, as shown here, are a real issue. The roof is framed with 2x6s. Given 1.5" for ventilation, this leaves us with but 3" for insulation - which would be about R-15 at the most. This doesn't seem like enough.
My stepfather suggested furring out the diagonal walls a bit so that there would be more space for insulation. While this sounds good in theory, I again come to the preservation issue. The faux-Tudory elements were added in the 1970s or 1980s, so they can be removed or adjusted without consequence. At that time, drywall was placed over the existing walls. The walls are of fiberboard, but unlike the rest of the house, they were never plastered - nor, given how the trim was installed, were they meant to be. Tearing it out to install insulation won't make any difference in the character of the house, so this shouldn't be an issue, but somehow, it is.
Of course, it will be really really really nice to have the thermostat up above 55.
The Voice of Reason
This Saturday, my mom and stepfather came over for a late lunch, and to consult on various house projects, present and future. My stepfather has sold bulding materials for the past 30 years, so while he may not have the experience of someone who has actually done some of this stuff, he has a pretty good idea about what works and what doesn't. He has the insight to figure out how to make things work on a budget. Finally, he tends to be more interested in the solutions that perform the best rather than those that a historic preservationist might choose. This means that I'll hear ideas from him that I wouldn't have otherwise considered, and that I may not be willing to adopt, but that at least will allow me to make a more informed decision.
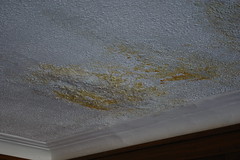
As I mentioned earlier, a plumbing leak caused this set of lovely bulges and stains on the library ceiling. After I heard my contractor's estimate, I decided that I would do the repair myself. The question became how to rip out the ceiling without damaging the plaster crown moulding.
My stepfather pointed out that the crown moulding was really not in very good shape. On one wall, a large area was repaired quite clumsily. In other places, the moulding appears to be detatching from its substrate.

Further, as can be seen here, access to the moulding is made difficult by the trim that goes over the blinds and drapes. This trim is constructed in such a way that it would be quite difficult to remove without causing some damage. Conversely, with it in place, it would be very difficult to cut out the existing plaster without damaging the crown moulding.
This all comes down to the question of just how much of a historic preservationist nutjob I am (as well as how much of a preservationist nutjob my wife can stand to live with). Given the right house, I could put an insane amount of labor into historic preservation - for instance, for any sort of American farmhouse from the first third of the 18th century, I'd do almost anything. I'd be willing to strip layer upon layer of paint off of woodwork to get down to the original paint or go to ridiculous lengths to repair parts others said were unrepairable.
This, however, is not such a house. It is a very good, but not great example of the sort of house built in this city in the 1920s. While the bathrooms are mostly original, 2 of the toilets have been replaced as well as all of the faucets. There has been some rather clumsy tile work done here and there as plumbing was upgraded. Most significantly, all of the kitchen cabinets were replaced in the 1950s.
Over the course of the work I've done on this house, I've come to the conclusion that, at the time we moved in, all of the walls were the original plaster. The ceiling in many areas has been covered with spikey plaster, but under that, to the best of my ability to tell, the plaster is original. I tore out the wall on one side of the stairs down to the basement and the ceiling in the shower, both to fix city code violations. When I tore out the wall on the basement stairs, I didn't realize that it was original - I thought, from the way it was bowed and shaped that it must have been someone's clumsy attempt at a repair. The material seemed like drywall, so I assumed a later repair. Only when I began tearing open the ceiling in the shower, which was clearly original, did I realize that all the walls in the house were comprised of plaster on fiberboard.
Do I regret tearing out these walls? A little bit. Would I have found ways to avoid doing so if I had it to do again? Maybe. The light fixture at the time in the shower scared me - a plain bit of porcelain with a bare bulb. If I had known at the time that I started to tear out the ceiling how relatively water-resistant it was, in comparison to most similar fixtures, I might have tried to argue with city hall in favor of ignoring this code violation. Again, if I had realized that the walls going down to the basement were original, I might have considered just drywalling over them or smoothing them out in some other way.
However, I didn't know any of this at the time, and as a result, I can no longer boast that I have entirely original plaster walls. This puts me on a slippery slope with regard to the rest of the house. If I hadn't torn out the walls in the other two locations, I'd feel more strongly about the ceiling in the library. Or, if the kitchen was original, I'd work harder to retain absolutely every original detail, no matter how small.
Further, the ceiling of the library has been covered with spikey plaster and a least a couple layers of paint. This makes it just about impossible to remove the ugly spikey plaster. While the ceiling could probably be repaired by removing but half of the plaster, that would leave me with the dilemma of how to finish the area that I replaced. I hate spikey plaster. Hate hate hate. I hate it more than 1970s faux wood paneling. If I replaced but half of the plaster, I'd be left with a ceiling that would be half smooth and half spikey. I simply cannot bring myself to put textured plaster on the area that I will be repairing.
Finally, it will be really nice to have access to just about all of the plumbing for the second floor bathrooms. A large part of this plumbing is highly suspect - though not because of previous work, but merely because of age. It will be really really nice to have access to all the deteriorating parts and replace those that need to be replaced.
With all this in mind, my stepfather pointed out that the plaster was not in very good condition and that previous repairs had been less than sympathetic. He suggested ripping out the entire ceiling and replacing it with drywall. No two rooms share the same moulding, so it removing it will not remove some similarity between it and the rest of the house. When I am able, I will find some walnut crown moulding and install it. While it may not be a match to the original, it will match the intent and feel of the room.
Of course, I will thouroughly document the original moulding, and retain a section (or sections) of it in good condition, as a record. This seems to me the most reasonable solution.
UPDATE:
It seems that this is a somewhat moot point. I've found, in the course of my demolition, that the ceiling has been replaced at a date that is definitely in the past 40 years. I'm still unsure about the age of the moulding. More to follow.
As I mentioned earlier, a plumbing leak caused this set of lovely bulges and stains on the library ceiling. After I heard my contractor's estimate, I decided that I would do the repair myself. The question became how to rip out the ceiling without damaging the plaster crown moulding.
My stepfather pointed out that the crown moulding was really not in very good shape. On one wall, a large area was repaired quite clumsily. In other places, the moulding appears to be detatching from its substrate.
Further, as can be seen here, access to the moulding is made difficult by the trim that goes over the blinds and drapes. This trim is constructed in such a way that it would be quite difficult to remove without causing some damage. Conversely, with it in place, it would be very difficult to cut out the existing plaster without damaging the crown moulding.
This all comes down to the question of just how much of a historic preservationist nutjob I am (as well as how much of a preservationist nutjob my wife can stand to live with). Given the right house, I could put an insane amount of labor into historic preservation - for instance, for any sort of American farmhouse from the first third of the 18th century, I'd do almost anything. I'd be willing to strip layer upon layer of paint off of woodwork to get down to the original paint or go to ridiculous lengths to repair parts others said were unrepairable.
This, however, is not such a house. It is a very good, but not great example of the sort of house built in this city in the 1920s. While the bathrooms are mostly original, 2 of the toilets have been replaced as well as all of the faucets. There has been some rather clumsy tile work done here and there as plumbing was upgraded. Most significantly, all of the kitchen cabinets were replaced in the 1950s.
Over the course of the work I've done on this house, I've come to the conclusion that, at the time we moved in, all of the walls were the original plaster. The ceiling in many areas has been covered with spikey plaster, but under that, to the best of my ability to tell, the plaster is original. I tore out the wall on one side of the stairs down to the basement and the ceiling in the shower, both to fix city code violations. When I tore out the wall on the basement stairs, I didn't realize that it was original - I thought, from the way it was bowed and shaped that it must have been someone's clumsy attempt at a repair. The material seemed like drywall, so I assumed a later repair. Only when I began tearing open the ceiling in the shower, which was clearly original, did I realize that all the walls in the house were comprised of plaster on fiberboard.
Do I regret tearing out these walls? A little bit. Would I have found ways to avoid doing so if I had it to do again? Maybe. The light fixture at the time in the shower scared me - a plain bit of porcelain with a bare bulb. If I had known at the time that I started to tear out the ceiling how relatively water-resistant it was, in comparison to most similar fixtures, I might have tried to argue with city hall in favor of ignoring this code violation. Again, if I had realized that the walls going down to the basement were original, I might have considered just drywalling over them or smoothing them out in some other way.
However, I didn't know any of this at the time, and as a result, I can no longer boast that I have entirely original plaster walls. This puts me on a slippery slope with regard to the rest of the house. If I hadn't torn out the walls in the other two locations, I'd feel more strongly about the ceiling in the library. Or, if the kitchen was original, I'd work harder to retain absolutely every original detail, no matter how small.
Further, the ceiling of the library has been covered with spikey plaster and a least a couple layers of paint. This makes it just about impossible to remove the ugly spikey plaster. While the ceiling could probably be repaired by removing but half of the plaster, that would leave me with the dilemma of how to finish the area that I replaced. I hate spikey plaster. Hate hate hate. I hate it more than 1970s faux wood paneling. If I replaced but half of the plaster, I'd be left with a ceiling that would be half smooth and half spikey. I simply cannot bring myself to put textured plaster on the area that I will be repairing.
Finally, it will be really nice to have access to just about all of the plumbing for the second floor bathrooms. A large part of this plumbing is highly suspect - though not because of previous work, but merely because of age. It will be really really nice to have access to all the deteriorating parts and replace those that need to be replaced.
With all this in mind, my stepfather pointed out that the plaster was not in very good condition and that previous repairs had been less than sympathetic. He suggested ripping out the entire ceiling and replacing it with drywall. No two rooms share the same moulding, so it removing it will not remove some similarity between it and the rest of the house. When I am able, I will find some walnut crown moulding and install it. While it may not be a match to the original, it will match the intent and feel of the room.
Of course, I will thouroughly document the original moulding, and retain a section (or sections) of it in good condition, as a record. This seems to me the most reasonable solution.
UPDATE:
It seems that this is a somewhat moot point. I've found, in the course of my demolition, that the ceiling has been replaced at a date that is definitely in the past 40 years. I'm still unsure about the age of the moulding. More to follow.
For those cold winter nights when your spouse makes you sleep in the garage
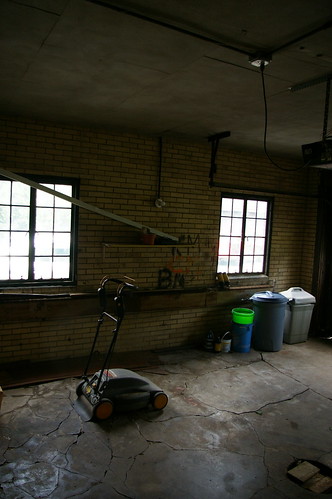
One of the curious things about our house is presence of radiators in the garage. They are along the wall, just under the windows. Our garage is detached from the house, so it's not as though the garage needs to be heated.
Ah, the joys of a time of cheaper gas.
Friday, February 13, 2009
The one that got away

I've mentioned this house before. This is the one that we probably would have purchased if the listing agent hadn't been impossible to reach and totally non-responsive. It also had an awful listing photograph:

This was the only photograph in the listing, and is displayed here at full resolution.
It appears to have been relisted listed by a different agent, after quite a few months off the market.
It's really an attractive house, for the right person, although I believe that the asking price is too high. I think, right now, something around $20-30K would be reasonable, with the seller paying the back taxes and city assessments. There are numerous small code violations that need to be fixed, and there is a leak in the roof in one spot due to a gutter that doesn't have a downspout. The big issue is that the property was not properly secured and the copper plumbing has been ripped out everywhere it could be reached with a bolt cutter.
The lot is more than twice the size of what one might expect for a duplex like this - .4 acres. If we had purchased it, I'd convert it into a single family home. I'd take the opportunity created by the lack of plumbing to have all the mechanicals replaced. One could buy this house and have the mechanical work done very comfortably in a 15 year mortgage, with money left over for other rehab work in the house as well. When one considers the size of the house, the yard, the location, and that you'd essentially have a very livable shell with great mechanicals for $100,000, it suddenly looks like a good value.
What bank would be willing to finance such a project, with the economy as it is? I discussed this with my lender, Third Federal Savings & Loan, who said that there should be no problem getting a loan to purchase and rehab this house, so long as the house would appraise for the total value once the work was complete. The rate would be the same as their published rates for a standard mortgage (currently 4.8% on a 15 year or 5.05% on a 30 year). They'd require that an outside contractor would do the work. Other than this, they saw no problem with my plan.
It's a great house for someone with a bit of vision.
Thursday, February 12, 2009
Water, water everywhere
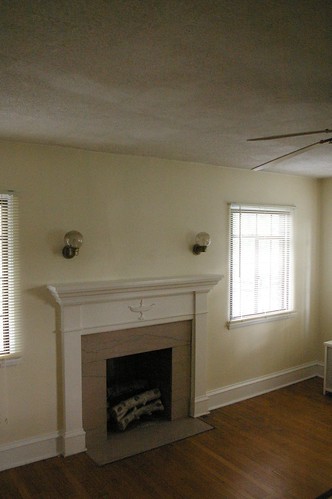
This fireplace is in our master bedroom, directly above the fireplace in the living room. It's been raining on and off for the past couple days, and with the rain, a rather interesting occurance:
Water is dripping down the marble crosspiece. It is somehow coming down behind the wood trim of the mantle, presumably due to bad flashing somewhere along the way. Sigh. We're going to keep a roofer busy for a while. I'm not sure which one, but one of them...
Cheap Oriental rugs?
I've been searching several local Craigslists and some auction houses in the area for an Oriental rug for the dining room. Nothing too fancy, just something large (9x12 - 10x13ish) and in a reasonable color palette. In our price range, I was expecting something with plenty of wear. This didn't seem a real issue to me - I want this rug to use, not as an investment.
For some reason, I hadn't seriously looked at eBay. I checked it from time to time to see if there were any rugs nearby that looked good, but never found anything. I must have assumed that shipping would be very expensive. Imagine my surprise when I noticed a rug within my budget that met my criteria, was ending soon, and had the "free shipping" icon next to it. I assumed that the price would be bid up in the last couple minutes. I left the tab open and was surprised to see, later, that the price it reached was quite reasonable and still in budget.
Pleased with my discovery, I investigated further. I found many rugs that would do quite nicely in our dining room in the $150-300 range, shipped. Here are a few:
A 9x12 rug for $180
A 10x13 rug for $220
Another 10x13 rug for $160
As the price goes up, the designs become more appealing. I also observed that rugs that had been patched in one spot but were otherwise quite nice at quite low prices - sometimes less than $100. Perhaps they would not be right for the dining room, but for a room where part of the rug might be covered by a piece of furniture, these could be a good value.
Unfortunately, this purchase will have to wait for a while. Due to the recent damage to our roof, we're holding off on major purchases until we have a reasonable estimate or two.
Not lazy, efficient

We just got the estimate for fixing the ceiling in the library from our general contractor. $300-400. I'm starting to think that I'll do it myself, especially as the amount of work that our roof seems like it will require mounts up - but that's a story for another entry. It's a chunk of money that the house probably needs more in other places.
The challenging part of the repair is the crown moulding, which is plaster. I'd have to cut a straight line near the edge of the crown moulding, cut out the existing plaster and fiberboard, and put in new drywall. Messy but relatively inexpensive. $30 worth of materials - $40 at the most, knowing how I go through mud.
I'm starting to think about a much easier alternative, thus the title of this entry. Perhaps I could just paint over the water stains with Killz and then repaint. What are a few unsightly bulges in the ceiling, anyway? No one (except me) complained when they were smaller.
My real fear, I think, is that I'll tear out the ceiling and be forced to deal with the plumbing for the bathrooms, which sit above the library. While it would be quite handy to have access to them, I fear all the things that might be wrong - and if the ceiling is going to be open, they should be dealt with now.
There is a problem that many of my projects run into while they are in my head, in the planning stage of the game. We plan to be in this house for at least the next 27 years (not that I'm counting down the years until retirement, but I doubt I'll ever find a better place to work, so there's no real reason to move until then), and probably the next 60 years. Thus, I look at things here long term. If I can do something once and do it right, I want to do it that way. I don't want to take the cheap short cut.
It seems, in my head, that every project leads to another project. Fixing the roof requires insulating the attic which requires rewiring the attic... does it never end?
Monday, February 9, 2009
I see dead slates!
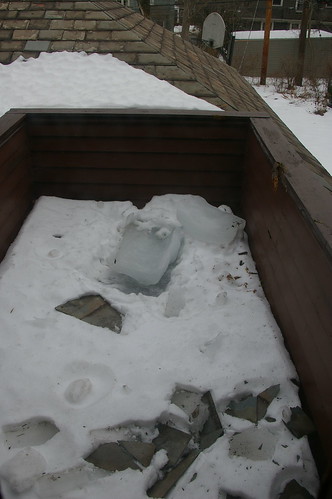
When I woke up on Sunday morning and looked out onto the breezeway, on my way downstairs to get the newspaper, this is what I saw. Note the broken slates and the couple hundred pound chunk of ice. Also note the chunk of wood broken off of the porch railing - however, that is minor, in comparison to the roof.
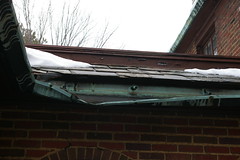
When I went out to get the newspaper, I saw that the gutter on the breezeway had suffered some significant damage, too. Doh!
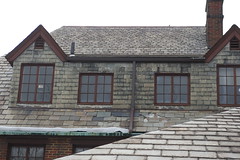
The worst part, however, is underneath this dormer.
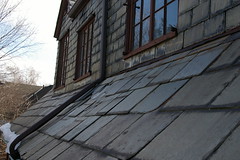
Here's a detail from one side.
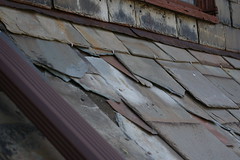
And from the other. Note the row of slate hooks. Note all the copper, almost pristine, indicating a relatively recent repair. Clearly we need to address the root cause of this ice damage, namely, the large pieces of ice falling off the house, or this will continue to be a problem for the forseeable future.
Update:
Dennis M. Crookshanks will be over this afternoon to evaluate what we can do short term to prevent leaks as well as to look at the house and determine what need to be done long term. Here's hoping...
Saturday, February 7, 2009
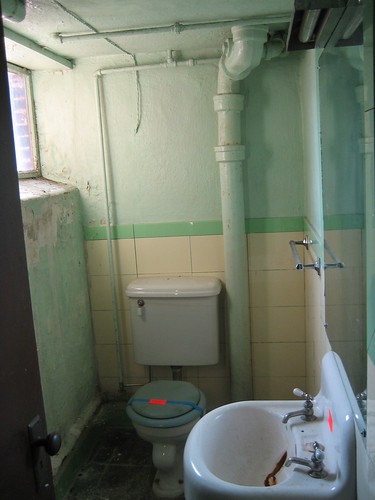
Ack! Water leak!
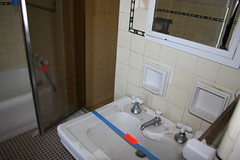
I've been trying to snake out the sinks in the two second floor bathrooms. Since they both back up to the same wall, it is difficult, becuase the snake is inclined to go into the drainpipe for the other sink rather than down the drain. I had to take apart the trap, of course, because it is impossible to get the snake down the drain.
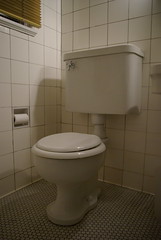
Anyway, it seems that I managed to jostle the tank of the beautiful original toilet sitting next to the sink, or so the coming events would tend to indicate. On Thursday, feeling absolutely awful and realizing I really needed sleep so that I might get better, I called in sick. Around 1 in the afternoon, A. noticed that there was water dripping through the library ceiling! I ran around, trying to catch the water, protect the contents of the library, and shut off the pipes.
The secondary shut off valve for the second floor bathrooms was so old as to not be terribly functional - when I shut it off, it started spraying water all over the place in the basement. This does not portend well for the other shut off valves down there. Anyway, I was finally able to trace the leak to the toilet shown above - water was leaking from the tank, dripping onto the floor.
When the plumber and general contractor came, they found that the mounting bolts for the toilet on the floor and wall had completely rusted away. They can get the parts, so it's just a matter of waiting for that to happen. Meh.
Now I'm just looking for a way to fix the damaged finish of the floor in the library. It looks all gray from the water. First, of course, we will try to wash the floor - I hope a certain amount of this is just plaster dust.
I'm torn between really really needing another good day of rest and starting to tackle the ceiling in the library.
Subscribe to:
Posts (Atom)